
Infrastructure as Code: time to ship these containers
So we built our mock service and we dockerized it. Next up, run the container on the cloud.
Remember that in our scenario -and in my everyday work life- the mock service has to be accessible from people outside our local network. Of course, one way to do this would be to run it in-house and open a hole in your firewall.
…if you didn’t scream “BAD IDEA!” when you read the last sentence, now it would be the right time to do so 🙂
So, cloud to the rescue. We’ll use Azure here; we’ll create a subscription and then deploy with a terraform infrastructure-as-service (IaC) configuration. So our steps will be:
- Create the Azure subscription (manual step)
- Create the terraform config that creates a resource group , an app service plan and a web app for containers.
- Deploy to azure
- Test that it works by calling the /servicehealth path of the mock service.
If you’re deploying an actual application (say, a REST API that connects to a database) on the cloud you probably need more. For example, you might need a firewall, a virtual LAN so that different servers talk to each other but are isolated from the world, an API gateway, a cloud sql database and maybe more. But for our mock service, which has no data that need protection, we can keep it really simple.
- Open the azure portal and either create a new subscription or login if you have one already. For new subscriptions, Microsoft gives $200 or usage for free so you can experiment a bit. Running this tutorial has taken me less than $1 out of this amount, so no money actually left my pocket 🙂
After you created the subscription, you need to download the Azure Command-Line Interface (CLI), which is basically a powershell module. If you’re running on Linux -as I am at home- you also need Powershell Core (get it here). After installing, open a powershell prompt (you can also do it from ye olde command prompt) and run:
az login
Follow the instructions and you’re done.
2. Create an devops folder and create an empty text file inside. Name it service.tf and paste the following:
# Configure the Azure provider
provider "azurerm" {
  # for production deployments it's wise to fix the provider version
  #version = "~>1.32.0"

  subscription_id = var.subscription_id
  client_id       = var.client_id
  client_secret   = var.client_secret
  tenant_id       = var.tenant_id
}

# Create a new resource group
resource "azurerm_resource_group" "rg" {
    name     = var.basename
    location = var.azurelocation

    tags = {
        environment = var.envtype
    }
}

# Create an App Service Plan with Linux
resource "azurerm_app_service_plan" "appserviceplan" {
  name                = "${azurerm_resource_group.rg.name}-APPPLAN"
  location            = azurerm_resource_group.rg.location
  resource_group_name = azurerm_resource_group.rg.name

  # Define Linux as Host OS
  kind = "Linux"
  reserved = true # Mandatory for Linux plans

  # Choose size
  # https://azure.microsoft.com/en-us/pricing/details/app-service/linux/
  sku {
    tier = var.SKUtier
    size = var.SKUsize
  }
}

# Create an Azure Web App for Containers in that App Service Plan
resource "azurerm_app_service" "appsvc" {
  name                = azurerm_resource_group.rg.name
  location            = azurerm_resource_group.rg.location
  resource_group_name = azurerm_resource_group.rg.name
  app_service_plan_id = azurerm_app_service_plan.appserviceplan.id

  # Do not attach Storage by default
  app_settings = {
    WEBSITES_ENABLE_APP_SERVICE_STORAGE = false

    /*
    # Settings for private Container Registires
    DOCKER_REGISTRY_SERVER_URL      = ""
    DOCKER_REGISTRY_SERVER_USERNAME = ""
    DOCKER_REGISTRY_SERVER_PASSWORD = ""
    */
  }

  # Configure Docker Image to load on start
  site_config {
    linux_fx_version = "DOCKER|${var.DockerImage}"
    #always_on        = "false"
    #ftps_state       = "FtpsOnly"
  }

  logs {
    http_logs {
      file_system {
        retention_in_days = var.logdays
        retention_in_mb   = var.logsizemb
      }
    }
  }

  identity {
    type = "SystemAssigned"
  }
}

output "DockerUrl" {
    value = azurerm_app_service.appsvc.default_site_hostname
}
Inside this configuration you may have noticed that we used a few variables, like var.basename. In terraform, we define variables and their values in separate files so that we can use the same base configuration with different details. A common scenario is the same configuration for testing, staging and production environments but with different names (think graubfinance-test for testing, graubfinance-staging for preprod and graubfinance for prod), different service levels etc.
Following best practice, these variables should be defined. Create another empty file called service-vars.tf and paste the following:
variable "basename" {
  type    = string
}

variable "azurelocation" {
  type    = string
}

variable "subscription_id" {
  type    = string
}

variable "client_id" {
  type    = string
}

variable "client_secret" {
  type    = string
}

variable "tenant_id" {
  type    = string
}

variable "envtype" {
    type    = string
}

variable "SKUsize" {
    type    = string
}

variable "SKUtier" {
    type    = string
}

variable "DockerImage" {
    type    = string
}

variable "logdays" {
    type    = number
}

variable "logsizemb" {
    type    = number
}
Now we need one or more “variable values” (.tfvars) files to define the values for our intended environment. Create yet another file, name it service-varvalues-dev.tfvars and paste the following:
basename = "graubfinancemock"

# when logging in as a user via Azure CLI, these values must be null
subscription_id = null
client_id       = null
client_secret   = null
tenant_id       = null

envtype = "test"

# this can change depending on your preferences
# you can get location codes using
# az account list-locations
# e.g. try "eastus" or "centralindia"
azurelocation = "westeurope"

# Using the free tier generates an error.
# Seems that Microsoft does not want people to
# use their resources *completely* free?
# Who knew!
#SKUtier = "Free"
#SKUsize = "F1"

# This is still very cheap though
SKUtier = "Basic"
SKUsize = "B1"

DockerImage = "dandraka/graubfinancemock:latest"

logdays = 30
logsizemb = 30
We’ll use this when testing locally but for later (when we deploy via Azure Devops) we’ll need the same but with placeholders for the deployment process to change. So copy-paste this file as service-varvalues-pipeline.tfvars and change it to look like this:
basename = "#{basename}#"

# when logging in as a service, these must NOT be null
subscription_id = "#{subscription_id}#"
client_id       = "#{client_id}#"
client_secret   = "#{client_secret}#"
tenant_id       = "#{tenant_id}#"

envtype = "#{envtype}#"
azurelocation = "#{azurelocation}#"

SKUtier = "#{SKUtier}#"
SKUsize = "#{SKUsize}#"

DockerImage = "#{dockerimage}#"

logdays = 30
logsizemb = 30
Obviously the parts between #{…}# are placeholders. We’ll talk about these when we create the pipeline.
3. Now we’ll use terraform to deploy this configuration. Install terraform (instructions here, but basically it’s just an exe that you put in your path), then create a text file in your devops dir, name it terraformdeploy-dev.ps1 and paste the following:
terraform init
# here you need to see stuff happening and then
# "Terraform has been successfully initialized!"
terraform plan -out="out.plan" -var-file="service-varvalues-dev.tfvars"
# if everything went well, apply
terraform apply "out.plan"
Run it. If everything went well, you should get the following (or similar) output at the end:
Outputs:

DockerUrl = graubfinancemock.azurewebsites.net
In order to prepare ourselves for the automated deployment again, copy-paste this small script, name it terraformdeploy-pipeline.ps1 and just change the tfvars name. So the new file will look like this (I’ve stripped the comments here):
terraform init
terraform plan -out="out.plan" -var-file="service-varvalues-pipeline.tfvars"
terraform apply "out.plan"
4. Let’s see if it works
Navigate your browser to https://graubfinancemock.azurewebsites.net/servicehealth (or similar if you made any changes). That’s what you should see:

Hurray! 🙂
Notice also how we got https for free -we didn’t install any certificate or configured anything. Azure took care of it.
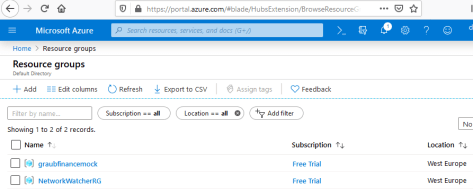
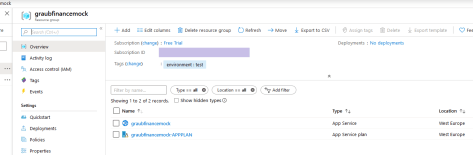
Out of curiosity, let’s head over to portal.azure.com to see what happened. Once there, click on “resource groups” and then “graubfinancemock” (or whatever you named it). You’ll see something like this:
Did it cost much? Click “Cost analysis” on the left, for scope select your subscription (by default named “Free trial”) and you see what you paid for our experiment:

It didn’t break the bank, did it? 🙂
To be fair, we didn’t really do much. Most of the CPU usage we were charged for went into getting the system -our linux container running wiremock- up and running. Just out of curiosity, how much does it cost if we use it a little more?
You can try the following experiment: have it answer 1000 (or whatever) requests and see what it costs. Try this powershell script:
cd $env:TEMP
mkdir testrequests
cd testrequests
for ($i=1;$i -le 1000;$i++) { Invoke-WebRequest -Uri "http://graubfinancemock.azurewebsites.net/servicehealth" -OutFile "out-$i.txt"; $i }
After it finishes, click refresh and let’s see the cost analysis again:
No joke: after 1000 requests, it didn’t change a cent. You can see why companies love the cloud! Though again, we didn’t use our CPU heavily -and that’s what Azure charges mostly for.
We’re close to finishing. The last thing to do is to automate the process via Azure Devops (a.k.a. VSTS, a.k.a. TFS Online). Just one last thing: since we’ll be doing the terraform deploy automatically, let’s delete everything we’ve done. Create a file named cleanup.ps1 inside our devops dir and paste the following:
param ([string]$rgName)

[bool]$rgExists = ((az group exists -n $rgName) -eq 'true')

if ($rgExists)
{
        az group delete -n $rgName -y
}
else
{
        Write-Host "Resource group $rgName does not exist, nothing to do"
}
Now in the command prompt, run:
./cleanup.ps1 -rgName graubfinancemock
A couple of minutes later, everything’s gone.
[EDIT] Just to be clear, this means that every time we deploy, we first delete everything and then we redo it from scratch.
This is fine for our scenario, the mock service, and in general it’s ok when both of these conditions are true:
1. Our Azure components have no state to lose (no databases etc) and
2. The down time doesn’t hurt.
For more complex scenarios, where you have real productive services, state, data etc this approach is not possible. In such cases you need to keep somewhere your plan and state files. This, and the best practice to do so, is explained here by the Terraform team and here by Microsoft.
Having created the auto deployment process, let’s add the missing sparkle and create the auto deployment pipeline.

2 thoughts on “Design by contract Tutorial, part 4/6: [Terraform] Mock your interfaces using Swagger, Wiremock, Docker, Azure Devops, Terraform and Azure”