Here we’re not going to talk about this kind 😊 But that doesn’t mean it’s not important.
It happens quite often that a script you need to run needs access to a resource, and for this you need to provide a secret. It might be a password, a token, whatever.
The easy way is obviously to have them in the script as variables. Is that a good solution?
If you did not answer NO THAT’S HORRIBLE… please change your answer until you do.
Ok so you don’t want to leave it lying around in a script. You can ask at runtime, like this:
$token = Read-Host -Prompt "Please enter the connection token:" -AsSecureString
That’s definitely not as bad. But the follow up problem is, the user needs to type (or, most probably, copy-paste) the secret every time they run the script. Where do the users store their secrets? Are you nudging them to store it in a notepad file for convenience?
In order to keep our systems safe, we need a way that is both secure and convenient.
That’s why using the Windows Credential Manager is a much, much better way. The users only have to recover the secret once, and then they have it stored in a safe way.
Here’s an example of how you can save the secret in Windows Credential manager. It uses the CredentialManager module.
# === DO NOT SAVE THIS SCRIPT ===

# How to save a secret

# PREREQUISITE:
# Install-Module CredentialManager -Scope CurrentUser

$secretName = 'myAzureServiceBusToken' # or whatever

New-StoredCredential -Target $secretName -Username 'myusername' -Pass 'mysecret' -Persist LocalMachine
And here’s how you can recover and use it:
# How to use the secret

# PREREQUISITE:
# Install-Module CredentialManager -Scope CurrentUser

$secretName = 'myAzureServiceBusToken' # or whatever

$cred=Get-StoredCredential -Target $secretName
$userName = $cred.UserName
$secret = $cred.GetNetworkCredential().Password

# do whatever you need with the secret
Just for completeness, here’s an example of how to call a REST API with this secret. I imagine that’s one of the most common use cases.
Who among us hasn’t found him- or herself in this very awkward position: committing a config or code file with secrets (such as passwords or API keys) and then semi-panicked googling how to delete it from source control.
Been there and let me tell you the easiest way to delete it: copy all the code on disk, delete the repository completely and then re-create it.
(if this is not an option, well, there’s still a way but with much more work and risk, so do keep that code backup around!)
But you know what’s even better? That’s right, avoid this in the first place! That’s why Git hooks are so useful: they work without you neededing to remember to check your config files every time.
So here’s my solution to this:
In the repository, go to .git/hooks and rename pre-commit.sample to pre-commit (i.e. remove the extension)
Open pre-commit with a text editor and replace its contents with the following:
Add a new directory on the root of the repository named hooks.
Inside this, add a text file named pre-commit.ps1 with the following code:
#
# Source: DotJim blog (http://dandraka.com)
# Jim Andrakakis, July 2022
#
Clear-Host
$ErrorActionPreference='Stop'

# ===== Change here =====
$listOfExtensions=@('*.xml','*.config')
$listOfSecretNodes=@('username','password','clientid','secret','connectionstring')
$acceptableString='lalala'
# ===== Change here =====

$codePath = (Get-Item -Path $PSScriptRoot).Parent.Parent.FullName

$errorList=New-Object -TypeName 'System.Collections.ArrayList'

foreach($ext in $listOfExtensions) {
    $list = Get-ChildItem -Path $codePath -Recurse -Filter $ext

    foreach($file in $list) {
        $fileName = $file.FullName
        if ($fileName.Contains('\bin\')) {
            continue
        }
        Write-Host "Checking $fileName for secrets"
        [xml]$xml=[xml]((Get-Content -Path $fileName).ToLowerInvariant())
        foreach($secretName in $listOfSecretNodes) {
            $nodes = $xml.SelectNodes("//*[contains(local-name(), '$secretName')]")
            foreach($node in $nodes) {
                if ($node.InnerText.ToLowerInvariant() -ne $acceptableString) {
                    $str = "[$fileName] $($node.Name) contains text other than '$acceptableString', please replace this with $acceptableString before commiting."
                    $errorList.Add($str) | Out-Null
                    Write-Warning $str
                }
            }
        }
    }
}

if ($errorList.Count -gt 0) {
    Write-Error 'Commit cancelled, please correct before commiting.'
}
So there you have it. I’m getting automatically stopped every time I tried to commit any .xml or .config file that contains a node with a name that contains username, password, clientid, secret or connectionstring, whenever the value of it is not ‘lalala’.
Obviously the extensions, node names and acceptable string can be changed at the top of the script. You can also change this quite easily to check JSON files as well.
Also note that this works on Windows (because of the Powershell path in the pre-commit hook) but with a minor change in the pre-commit bash script, you should be able to make it work cross-platform with Powershell core. I haven’t tested it but it should be:
Let’s start from the very beginning. First, I’ll explain a few things you’ll hear often. A lot of these words can seem daunting but actually are quite simple. Then we get down to the nitty gritty.
I DON’T WANT TO DO THIS WHY DO I NEED TO DO THIS???!??!
Because there are some things that you 1) want to be able to do on the internet but 2) don’t want other people to be able do (at least not without you knowing).
You don’t want other people to move money from your bank account. Or buy things with your credit card. You get the idea.
But but but I already have a password!
Yes, you do. But there are some problems.
If you’re, well, human, you can remember some things but not many and not very well (read this if you don’t believe me). And it’s 2021, if you don’t live under a rock you have at the very least 10-20 accounts in different services, like your bank, your email etc etc. Try to count them and write in the comments how many you found 😊
The other problem is: criminals steal data from these services. A lot. Like, in the billions. Estee Lauder had a breach on February 2020 where 440 million records -data about people- were stolen. MGM Resorts, which you know from the casino in “Ocean’s 11”, had personal information about more than 10 million guests stolen. And these are just 2 of the around 3000 data breaches that were reported in 2020 in the US alone.
What this means is that your password will get stolen and there’s nothing you can do about it. Well, almost nothing. You can and should do 3 things:
Have a unique password per service. This way, when your H&M password is stolen, it cannot be used to pay from your PayPal.
Use random passwords. For crying out loud, do not use your phone number. You think that adding a few letters here and there makes it safe. It does not. A computer with a program you can download for free can crack your “safe” password in like an hour. The password must be long and random, something like g5D9C467YxeEfAmqL. You get the idea.
Use 2-factor authentication. Since this post is already long, I’ll get to this in a later one.
What does “authentication” mean? And what are these “credentials” I keep hearing about?
Credentials just means whatever you need to give to a service, like a web site, so that it checks it’s really you. Some of it is secret, some of it is not. Usually it’s a username and a password but it might be more, like your fingerprint or a code that you receive in your phone.
Authentication is just the process that checks the credentials and lets you in (or not).
What’s a password manager?
It’s a program that stores your credentials and helps you use them. Because your passwords must be long, it’s tedious to have to type them yourself. So the password manager for example can auto-fill them, or you can copy-paste them, in your e-banking web site.
Ok, ok, I’ll do it, but which one should I use?
There are many good password managers you can use like 1Password, LastPass, Devolutions, NordPass and others. Here I’ll use my favourite one which is Bitwarden, because it’s arguably the best free one and in my humble opinion the easiest to use.
Obviously this is just one way to do it; it works and it’s secure, but of course you can change things, for example use a different program. The main things to consider if you decide to use another one is:
It should have both a computer as well as a smartphone application.
It should be able to synchronize your credentials between them.
It should be as simple to use as possible.
And how much time will it take?
Realistically, assuming you’re an average computer and smartphone user, for 5-10 web sites you’ll need around a couple of hours from start to finish. Obviously if you have dozens it will take more -not proportionally- but it’s also worth more. If you get stuck, write me in the comments and I’ll do my best to help.
UPDATE: some friends suggested that instead of doing all your sites at once, it makes the effort more manageable to do the most important ones first -e-banking, email etc. The rest you can do when you come across them in everyday use.
Now I’ll explain how you do it in your computer and smartphone. Ready, set, go!
We’ll start from your computer because usually it’s easier to create the account there. Then we’ll continue to your smartphone. But the very first thing you need to do is grab a piece of old fashioned paper.
Step 1: Write a password and a 6 digit code.
Get a paper. Yes the traditional one!
Not necessarily a post-it, but this will do as well
Write 20 or more random numbers and letters, both lower and capital. Something like 6xTzHx41jKQ3yg48FeR9sAb. This will be your password.
You don’t need to remember this.
In the same piece of paper write 6 random numbers. DO NOT USE ANYTHING REAL OR EVEN CLOSE TO IT LIKE YOUR BIRTHDAY OR YOUR POSTCODE OR YOUR PHONE, NOT EVEN CHANGED. This will be your unlock code.
This code will be the one and only thing you need to learn by heart.
Keep this paper safe in your desk at home but NOT in your computer -don’t take a photo of it or write it in a Word file.
Step 2: Create your Bitwarden account
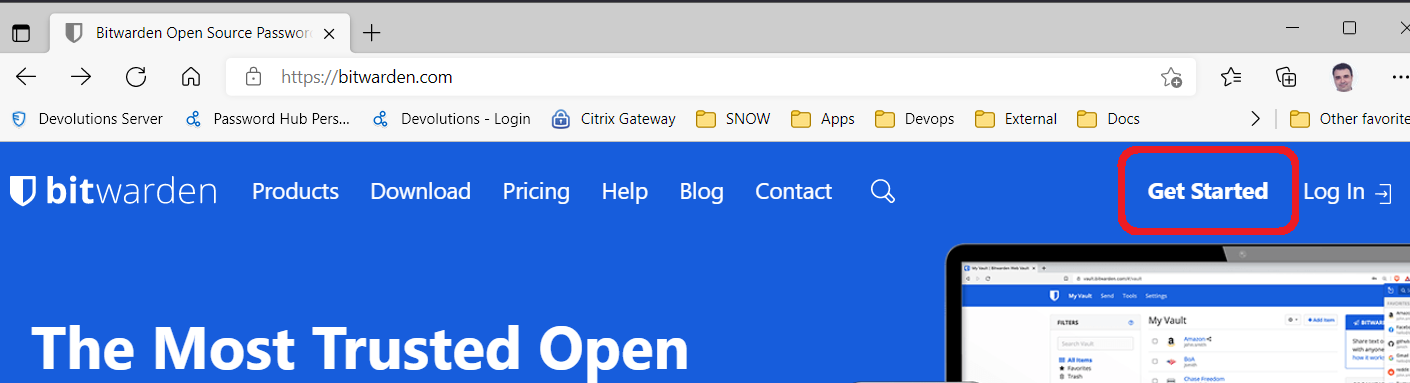
On your computer, go to bitwarden.com and click “Get started”.
Fill in the form, it’s really simple. Use the password you wrote on the paper.
Step 3: Install the browser extension
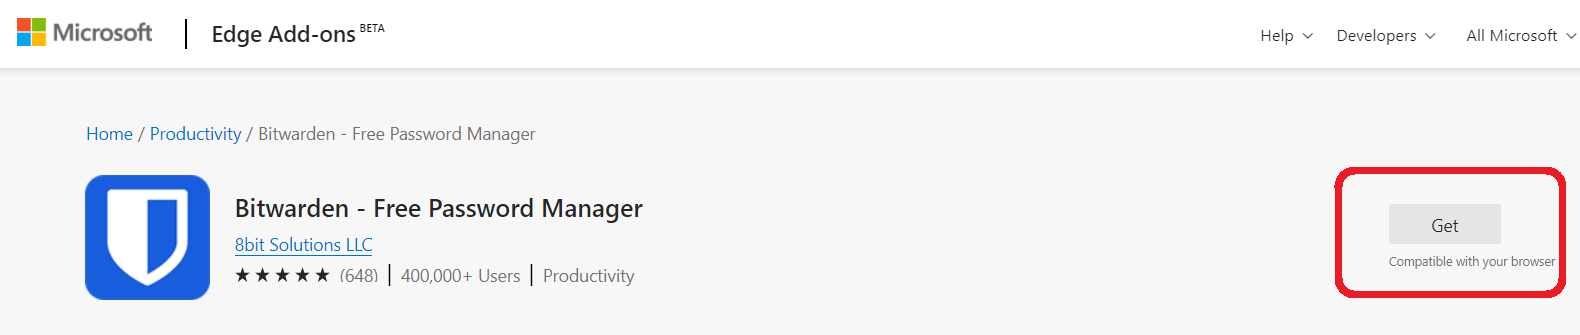
Still on your computer, open your favourite browser -Firefox, Chrome, Edge, Opera, whatever- go to the bitwarden extension and install it.
In case you’re using anything else, just google “bitwarden <browser name>” and you’ll find it.
NOTE: As you’ll see, about the only annoying thing with Bitwarden is that if you click outside of it before you save your changes, it closes and loses your input. There’s a solution for this: you can click the “Pop out” button” and then it opens as a separate window. The “Pop up” button is this one:
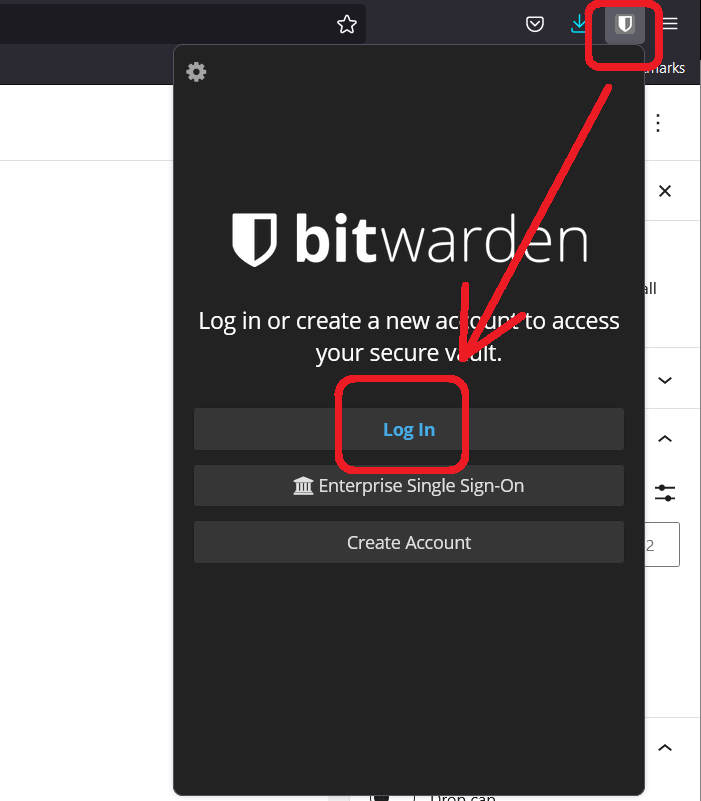
When the extension is installed, you’ll get the Bitwarden shield icon on the top right corner of your browser. Click it and fill in your email and password.
Once you log in you see your list of passwords. This a called your “vault”. For now, it’s obviously empty.
Click “Settings”, then “Unlock with pin”. Enter the 6 numbers you wrote on the paper and uncheck the “lock with master password…” check box.
Step 4: Store your credentials
If you’ve done so far, great job! Now it’s the time to start storing your passwords, one by one.
Click the shield icon of Bitwarden, then the plus icon on the top right corner.
Start with your email. Enter the name, username and password -the ones you have already. Add also the URL you use to access the site. Then click “Save”.
One by one, add all the sites and other services you have. This will probably take some time; my list has more than 400 entries 😊
Step 5: Try it
So all of this is supposed to help you right? Here’s how it helps you login. Say you want to log in to your email for example.
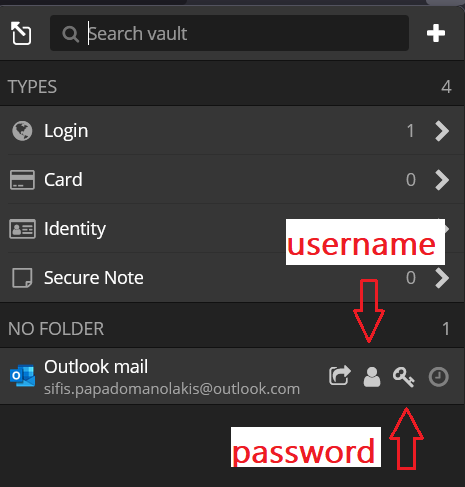
Click the shield icon of Bitwarden, click “My vault” and click the little arrow of the site. You’ll see that it takes you there.
In your email site, click “Sign in” or “Login” or whatever it has. Right click in the username or password and select Bitwarden > Auto-fill > your site name. Then click Next or Login or whatever it has.
If for whatever reason right click doesn’t find the site, there’s another way that’s not as easy but works every time. From “My vault” click the head icon to copy the username, then paste it in the site, then click the key icon to copy the password, then paste it in the site.
After doing it a few times, you’ll get the hang of it; it will feel very easy very quickly.
Step 6: Change your passwords
Until now you’ve done great, but we’re still using our old passwords. Now it’s the time to make them big and hard 😉
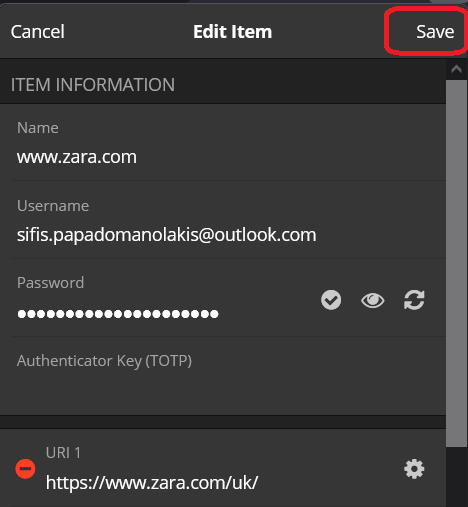
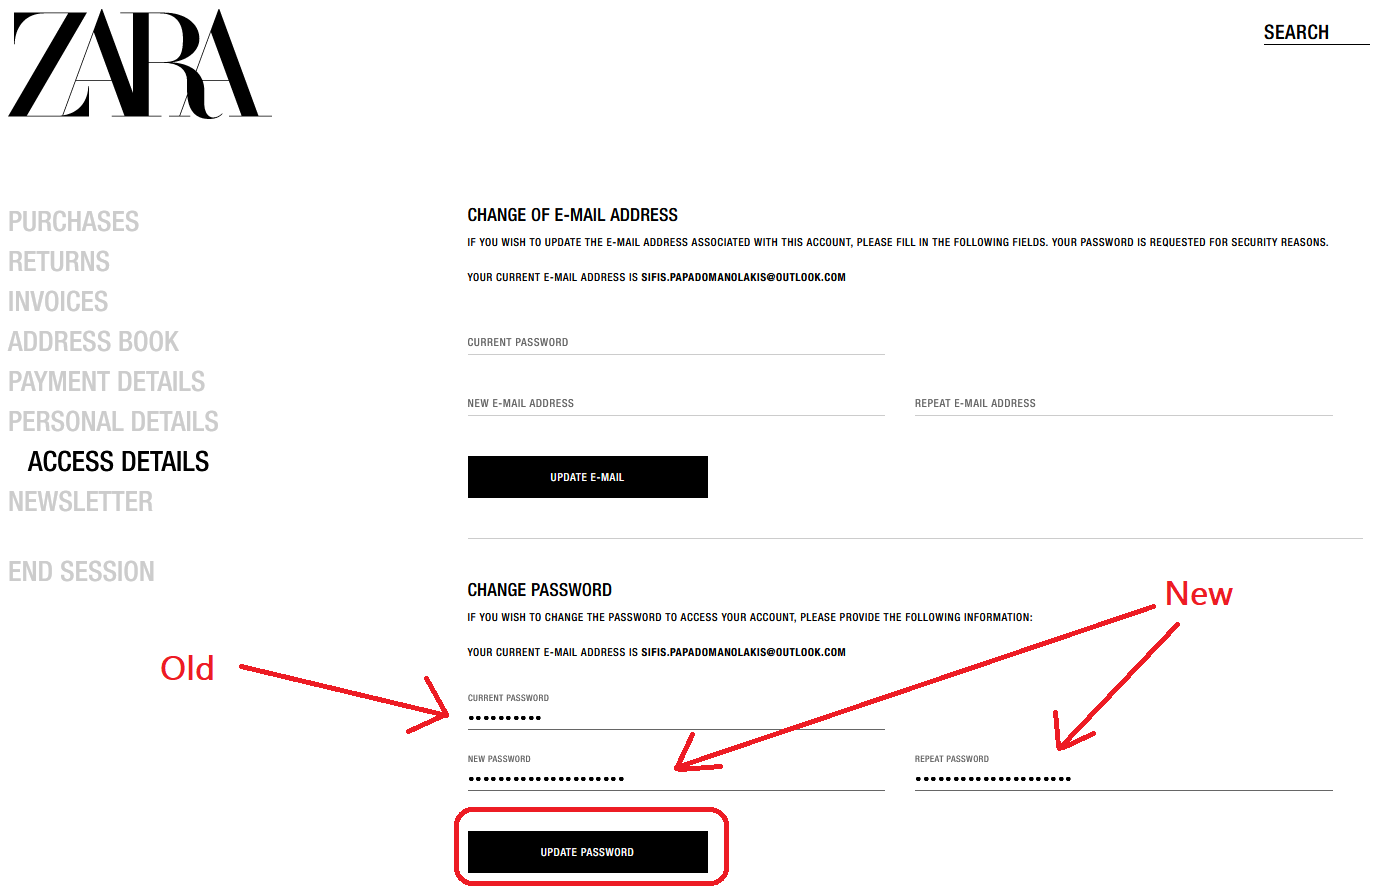
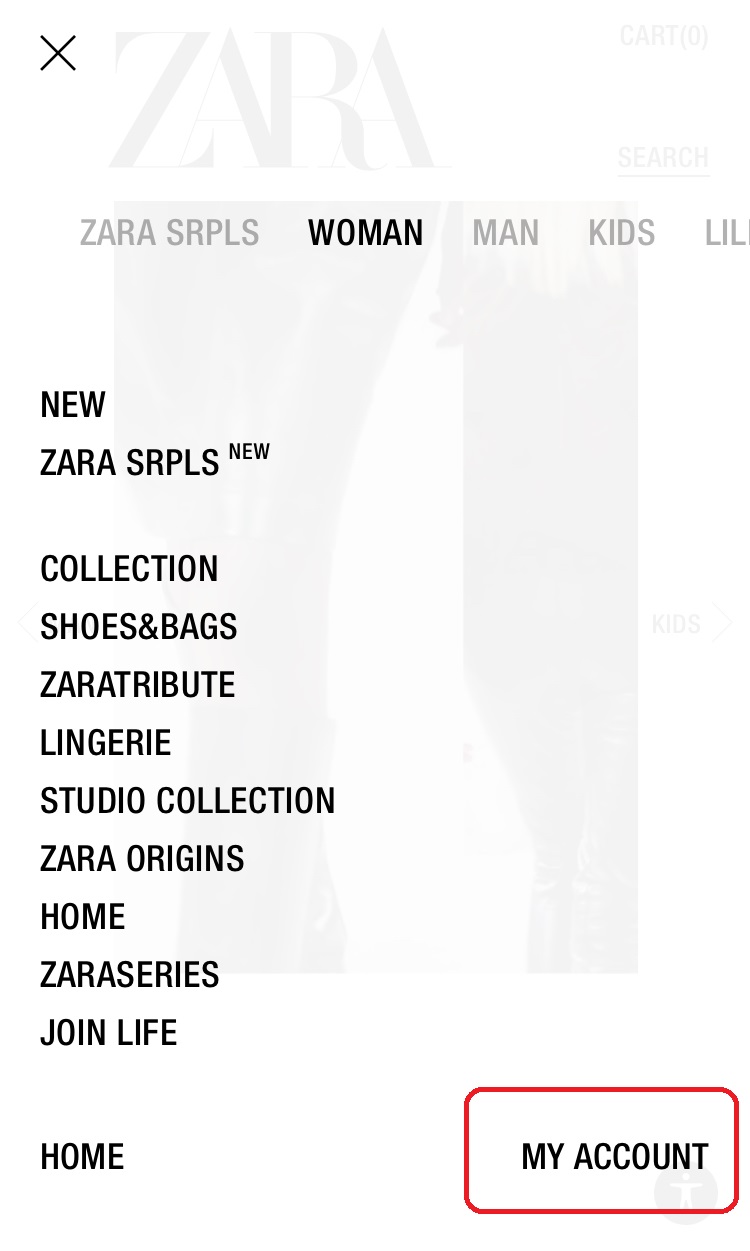
The exact process differs slightly for every site, obviously, but not much. In this example, I’ll use a popular e-shop, Zara UK.
Go to your profile and go to change password:
In the bitwarden “My vault” click the key icon of the site (see above) to copy the existing password. Paste it in the “Current password” box of the web site.
Then go in the bitwarden “My vault” again and click somewhere in the middle of the site name. This will open the entry. Click Edit on the top right corner.
Click the double arrow next to the password and click “yes” in the “overwrite password” question. Slide the length of the password to something over 17, click “regenerate” and then “select”.
Click “Save” to save the new password.
Now go to “My vault” again, click the key icon to copy the new password, go to the web site and paste it twice. Then click “Update password” or whatever button is there.
The first time you do it will be cumbersome, but after the first 2-3 sites, it will feel really easy.
If you’ve reached this far, congratulations 🥳🎉👏 You’ve done the hard work! The last thing to do is install the app on your smartphone so you can use it there too. Let’s go!
Here we get to the fun part -well, if not fun, certainly the easiest and most useful. I’ll give screenshots for iPhone, because that’s what I have, but for Android it’s almost the same.
Step 1: Install the Bitwarden App
Go to your App Store (or Play Store for Android), find Bitwarden and install it.
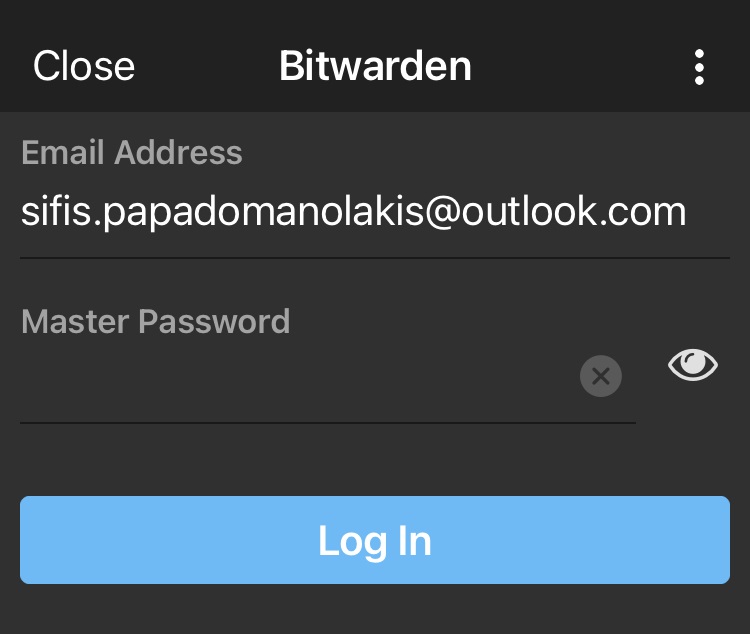
Step 2: Login
Open the app, click Log In and fill in the email and password (the one you wrote on the paper).
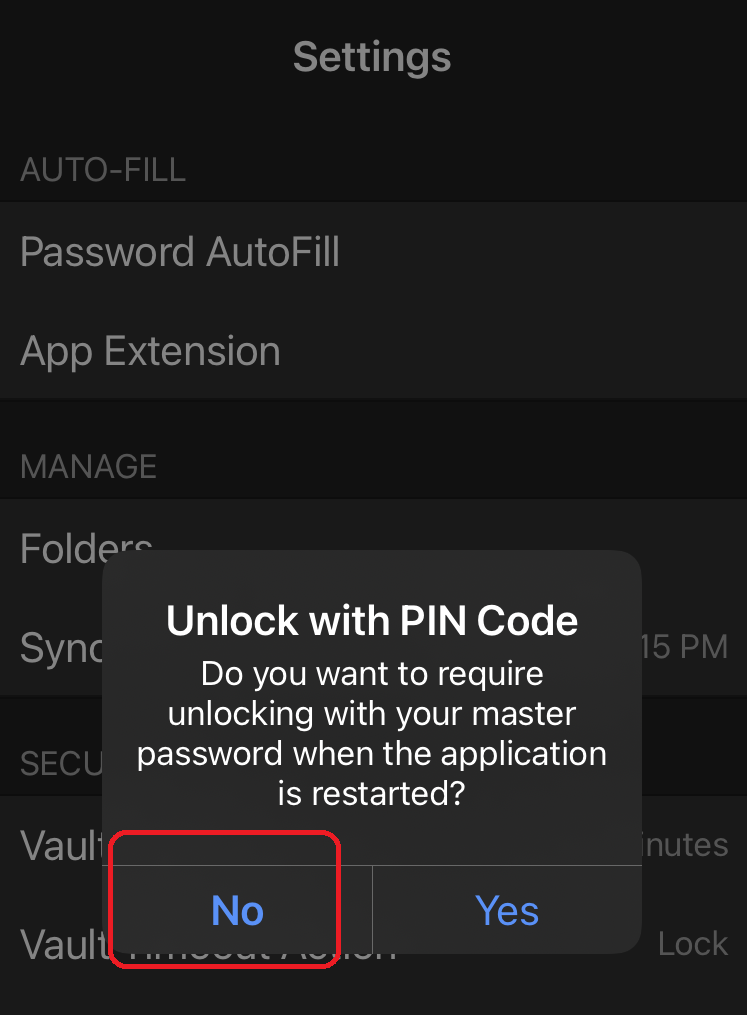
Go to Settings and press “Unlock with PIN code”. Enter the 6 digit number you wrote on the paper and select “No”.
We’re ready to use it!
Step 3: Use it to login to sites
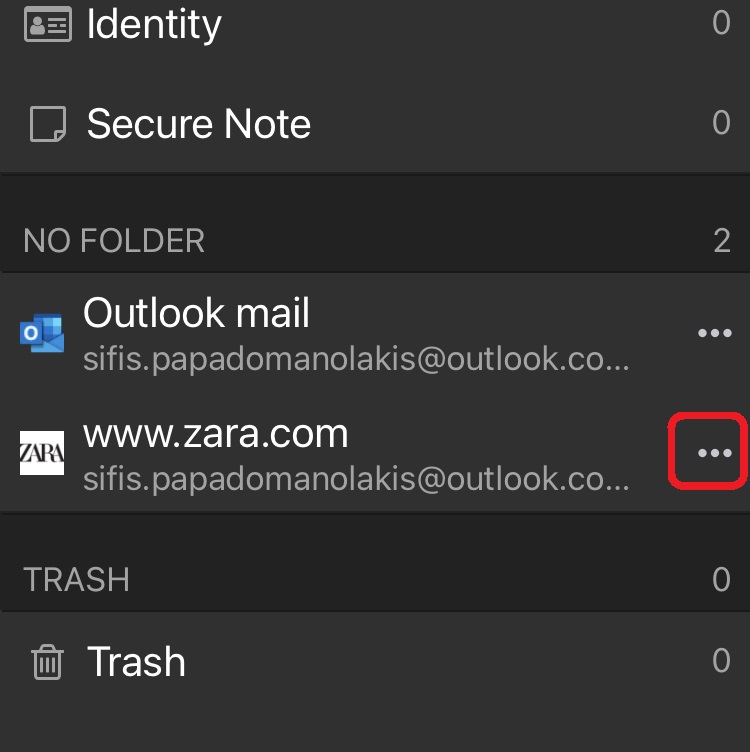
Let’s try to use the browser in our smartphone to login to Zara UK. Navigate to the web site and click Login, or My Account or whatever it has:
Now switch to Bitwarden (you might need to unlock it with your 6 digit code), find the site, press the 3 dots and click Copy Username.
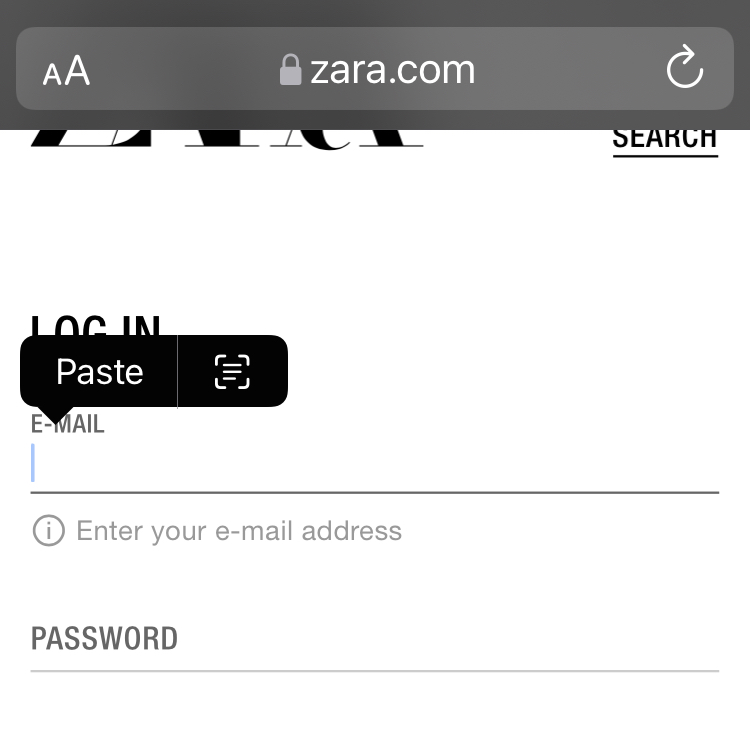
Switch to the browser, tap in the username box and paste the username.
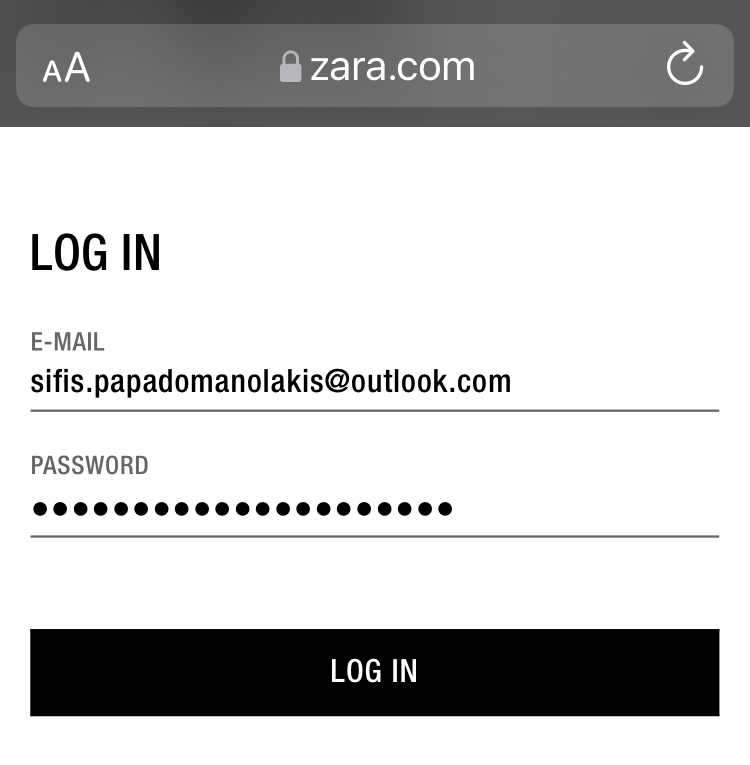
Repeat the same steps for the password and click Log In.
Ta da! We’re in!
That’s all folks
This was what you have to do to get started and work with Bitwarden. It’s not an exhaustive guide, mind you, there are more to it. But it covers the most important part: securely creating, storing and using unique passwords that are impossible to guess.
I hope this works for you. If you have any questions or suggestions, I’ll be more than happy to discuss in the comments!
Sooo you’re working in an enterprise and have to maintain an internal server. The security audit asks you to ensure all HTTP communications are encrypted, so you need to change to HTTPS. Boy is this SO not obvious. You’d think this should be quite easy by now, but there are A LOT of pitfalls in your way.
If you want the TL;DR version, to skip the explanation and go directly to the instructions, scroll directly to the Mandalorian below. No hard feelings, honest 😊
Mistake #1: Use a self-signed certificate
Many, many, MANY tutorials you’ll find online are written with a developer in mind, leaving the maintainer/admin as an afterthought -if that. So what they care about is having some certificate, any certificate, as long as it works on the developer’s PC.
But what this certificate says is basically “I’m Jim because I say so”.
Do I need to say that it won’t work for other PCs? Yes? Well surprise, it won’t.
Mistake #2: Get a certificate from your PC’s certificate authority
I don’t know how some people don’t understand that this, while being a bit more complex, it’s basically the same as #1. What this certificate says is “I’m Jim because someone else who is also Jim says so”.
Yeah, no, it won’t work.
Mistake #3: Get a certificate from a trusted certificate authority using only a server name (or an alias).
Now we’re getting more serious.
Getting a certificate from a trusted certificate authority (CA for short) is the right thing to do. The certificate you get then says “I’m Jim because someone else who you already trust says so”.
So if you get a certificate that verifies you’re, say, server web-ch-zh.xyz123.com or mysite.xyz123.com is good enough. Right?
Ummm…
IT DEPENDS.
If you run a website (e.g. https://www.xyz123.com) and want your HTTPS URL to work without giving a certificate warning that’s fine. You don’t need to do anything else. That’s why most tutorials that avoid the self-signed certificate mine stop here.
But remember, our scenario is that we’re working for an enterprise (a big company) and we’re maintaining an internal server. What that usually -not always, but a lot of the time- means is that communication to our server happens using different hostnames.
Let me give you my own example:
I run a service called Joint Information Module or JIM for short -that’s a totallyreal service name [1].
Another application uses the REST API of the service using the server name (ch-zh-jim-01) without the domain name (mycompany.local).
The service uses a queuing software that is installed on the same server. We want to use the same certificate for this as well. The JIM service accesses the queues via https://localhost (and a port number).
Now, if the certificate you got says “ch-zh-jim-01.mycompany.local ” and you try to access the server via https://ch-zh-jim-01, https://jim.mycompany.com, https://localhost or https://127.0.0.1, you’ll get a certificate error much like the following:
Also, the REST API won’t work. The caller will throw an exception, e.g. java.security.cert.CertPathValidatorException in Java or System.Security.Authentication.AuthenticationException in DotNet. You can avoid this by forcing your code to not care about invalid certificates but this is a) lazy b) bad c) reaaaaaaaaaaly bad, seriously man, don’t do this unless the API you’re connecting to is completely out of your control (e.g. it belongs to a government).
The correct way
So you need a certificate that is trusted and valid for all the names that will be used to communicate with your server. How do you do that? SIMPLEZ!
Generate a CSR (a certificate signing request, which is a small file you send to the CA) with the alternative names (SANs) you need. That’s what I’ll cover here.
Send it to a trusted CA
either the one your own company operates or
a commercial one (which you have to pay), say Digicert.
Get the signed certificate and install it on your software.
Important note: the CA you send the CSR to must support SANs. Not every CA supports this, for their own reasons. Make sure you read their FAQ or ask their helpdesk. Let’s Encrypt, a free and very popular CA, supports them.
Here I’ll show how you can generate a CSR, both in the “Microsoft World” (i.e. on a Windows machine) and in the “Java World” (i.e. on any machine that has Java installed).
A. Using Windows
Note that this is the GUI way to do this. There’s also a command line tool for this, certreq. I won’t cover it here as this post is already quite long, but you can read a nice guide here and Microsoft’s reference here. One thing to note though is that it’s a bit cumbersome to include SANs with this method.
Open C:\windows\System32\certlm.msc (“Local Computer Certificates”).
Expand “Personal” and right click on “Certificates”. Select “All tasks” > “Advanced Operations” > “Create Custom Request”.
In the “Before you begin” page, click Next.
In the “Select Certificate Enrollment Policy” page, click “Proceed without enrollment policy” and then Next.
In the “Custom Request” page, leave the defaults (CNG key / PKCS #10) and click Next.
In the “Certificate Information” page, click on Details, then on Properties.
In the “General” tab:
In the “Friendly Name” field write a short name for your certificate (that has nothing to do with the server). E.g. cert-jim-05-2021.
In the “Description” field, write a description, duh 😊
In the “Subject” tab:
Under “Subject Name” make sure the “Type” is set to “Full DN” and in the Value field paste the following (without the quotes): “CN=ch-zh-jim-01.mycompany.local, OU=IT, O=mycompany, L=Zurich, ST=ZH, C=CH” and click “Add”. Here:
Instead of “ch-zh-jim-01.mycompany.local” enter your full server name, complete with domain name. You can get it by typing ipconfig /all in a command prompt (combine Host Name and Primary Dns Suffix).
Instead of “IT” and “mycompany” enter your department and company name respectively.
Instead of “Zurich”, “ZH” and “CH” enter the city, state (or Kanton or Bundesland or region or whatever) and country respectively.
Under “Alternative Name”:
Change the type to “IP Address (v4)” and in the Value field type “127.0.0.1”. Click “Add”.
Change the type to “DNS” and in the Value field type the following, clicking “Add” every time:
localhost
ch-zh-jim-01 (i.e. the server name without the default domain)
jim.mycompany.com (i.e. the alias that will be normally used)
(add as many names as needed)
Important note: all names you enter there must be resolvable (i.e. there’s a DNS entry for the name) by the CA that will generate your certificate. Otherwise there’s no way they can confirm you’re telling the truth and the request will most likely be rejected.
It should end up looking like this:
In the “Extensions” tab, expand “Extended Key Usage (application policies)”. Select “Server Authentication” and “Client Authentication” and click “Add”.
In the “Private Key” tab, expand “Key Options”.
Set the “Key Size” to 2048 (recommended) or higher.
Check the “Mark private key exportable” check box.
(optional, but HIGHLY recommended) Check the “Strong private key protection” check box. This will make the process ask for a certificate password. Avoid only if your software doesn’t support this (although if it does, you really should question if you should be using it!).
At the end, click OK, then Next. Provide a password (make sure you keep it somewhere safe NOT ON A TEXT FILE ON YOUR DESKTOP, YOU KNOW THAT RIGHT???) and save the CSR file. That’s what you have to send to your CA, according to their instuctions.
B. Using Java
Here the process is sooo much simpler:
Open a command prompt (I’m assuming your Java/bin is in the system path; if not, cd to the bin directory of your Java installation). You should have enough permissions to write to your Java security dir; in Windows, that means that you need an administrative command prompt.
Create the certificate. Type the following, in one line, but given here splitted for clarity. Replace as explained below.
“cert-jim-05-2021”, both in the filename and the alias, with your certificate name (which is the short name for your certificate; this has nothing to do with the server itself).
“ch-zh-jim-01.mycompany.local” with the full DNS name of your server.
“IT” and “mycompany” with your department and company name respectively.
“Zurich”, “ZH” and “CH” with your city, state (or Kanton or Bundesland or region or whatever) and country respectively.
“ch-zh-jim-01” with your server name (without the domain name).
“jim.mycompany.com” with the DNS alias you’re using. You can add as many as needed, e.g. “DNS:jim.mycompany.com,DNS:jim-server.mycompany.com,DNS:jim.mycompany.gr,DNS:jim.mycompany.ch”
Important note: all names you enter there must be resolvable (i.e. there’s a DNS entry for the name) by the CA that will generate your certificate. Otherwise there’s no way they can confirm you’re telling the truth and the request will most likely be rejected.
“changeit” is the default password of the Java certificate store (JAVA_HOME/jre/lib/security/cacerts). It should be replaced by the actual password of the certificate store you’re using. But 99.999% of all java installations never get this changed 😊 so if you don’t know otherwise, leave it as it is.
“MYSUPERSECRETPASSWORD” is a password for the certificate. Make sure you keep it somewhere safe NOT ON A TEXT FILE ON YOUR DESKTOP, YOU KNOW THAT RIGHT???
That’s it. The CSR is saved in the path you specified (in the “-file” option). That’s what you have to send to your CA, according to their instuctions.
Last night I helped a close friend: I successfully fought off a Facebook account takeover. It wasn’t easy. I sweated for a couple of hours until I got it done. And I even had to face a rather unsophisticated, or maybe just lazy, enemy. Here I’ll recap what happened and give some easy but effective advice that you can easily use .
What happened?
As it happens with many IT professionals, I’m the go-to person for any computer related problems for family and friends.
My friend called me, frantically trying to explain that someone, using his Facebook account, was using Messenger to send personal messages to all his contacts. The message was in casual language, like you would talk to a friend, claiming that he had lost his wallet and asking if the friend has an account in a certain bank (obviously the bank had nothing to do with this). Most importantly, the message didn’t look obviously fake.
“Good evening.. how are you?!! I’m here and there. I lost my wallet 😦 Can I ask you something.. do you maybe have an account in Piraeus Bank? I need a big favor, I lost the bank card as well :(“
The response
Mitigation: informing people
To avoid people actually sending money, I logged into Messenger with my friend’s credentials and started sending messages to people that were replying, concerned about what had might have happened to their friend. I opted for something short, clear and alarming: “I’VE BEEN HACKED PLEASE IGNORE IT’S A VIRUS” (yes, I know that technically speaking that’s not especially accurate)
But the enemy was active and chatting with 2-3 of the contacts. In these cases, I saw my message being deleted.
I noticed that all his messages were more or less the same; he had some kind of playbook and was copy-pasting text, maybe slightly changing the text to fit the conversation.
And in one case he came close to being victorious: before I could sent the “please ignore” message, one of the contacts sent him some bank details -not sure what exactly as the message was deleted by the enemy, presumably after copying it. The contact then saw my message and replied alarmed “I sent him, what do I do now???” to which I replied “Call your bank NOW and lock your account and credit card”. I hope that helped; I’ll definitely follow up on that.
Taking back control of the account
The enemy hadn’t changed any password, so I was able to log in. Remember that Messenger accounts are controlled in Facebook (unless you have a Messenger-only account, which was not the case here). So the first thing I checked was the active sessions in Facebook (Settings > Security and Login Settings > Where You’re Logged In). That was what I got:
Unfortunately I didn’t know at the time that you can hover over the session with the mouse and get more info, like the session’s IP address. Had I done that, we could have a chance to retaliate -like going to the police.
My friend uses an Ubuntu laptop (which I set up for him), a Windows PC at work and a Samsung mobile where he uses Facebook and Messenger through the apps. So the first 3 sessions were almost certainly the enemy. I immediately disconnected him. Then I changed the password.
But we were not out of the woods yet.
The Empire Strikes Back
After changing the password and believing that I had locked him out for good, I continuing notifying people in Messenger. But after a few minutes, I suddenly saw a fresh batch of the same message being sent. My friend has around 500 contacts (“friends”) and I suppose there’s some limitation from Messenger so the enemy wasn’t able to send his message to everyone at once.
How was this possible? I had changed the password and disconnected his sessions. I glanced at Facebook Settings (“Where You’re Logged In”) and, sure enough, new sessions of the Huawei Mate 8 were there. He couldn’t have guessed the new 18-character completely random password I had set. I tried logging into Facebook from a private browser window and I got “Wrong password”. Hmmm… the options I had from Facebook for changing a forgotten password was 1) SMS 2) email 3) recognize people in pictures. Until that point, I had used SMS. So how did he do that?
I called my friend:
Me: please tell me that you don’t have the same password in your email as in Facebook (note: his password was something like “oldman53#”) Friend: no I don’t Me: so what’s your email password? Friend: The same but without the # at the end
NICE. Well that’s really damn secure I thought to myself, though I didn’t say anything -didn’t want to castigate my beleaguered friend, I’m saving that for the weekend 🙂
So first thing, as people were already replying in Messenger and there was real danger of someone sending money, I had to stop him getting in. So I went to Facebook settings to change the email.
The thing is, with the password already changed and unknown to me, I had to reset the password first. And Facebook wouldn’t send an SMS anymore, after having used it a few times already.
Return of the Jedi
So I had to resort to face recognition. The process presented me with 3 photos at a time, for a total of 5 people, and a list of possible names from the friends list. There was the option “I don’t know”, but you could use it only twice -then you were out.
Obviously these people were unknown to me, so I had to send them through What’s App to my friend. It took us around 10 precious minutes but at the end it worked. I immediately changed the email to one that I own (and has a decent, unique password and multi-factor authentication!).
After that, I disconnected his sessions and that was the end of it, I didn’t see him again. I quickly headed over to outlook.com, where his email is hosted, changed the password there and added two factor authentication by SMS.
I anxiously kept monitoring Facebook’s sessions in case he somehow came back on one window and at the same time continued to notify the hundreds of people he had sent his message to. At the same time I tested, with a private browser window, that I even knowing the password I couldn’t login to Facebook or outlook.com without an SMS to my friend’s phone.
After around half an hour had passed, I felt the worst were behind us. I called my friend and told him to log in to Messenger and continue talking to people.
Some conclusions
To be clear, the reason this happened was because my friend, like many, many people, had bad password hygiene. He was using relatively easy (for a machine) to guess passwords but most importantly, he was reusing passwordsbetween web sites. And web sites get passwords stolen. A lot.
What can you do to avoid this happening to you? Start from the low-hanging fruit. You get very decent security with very little effort.
So here’s a small TODO list:
UPDATE: I wrote a blog post explaining how to install and use a password manager. You can read it here.
Use random long (18 character or more) passwords. If it’s really random (e.g zGasd6t7a6tgQaERys6Ld5AoVF567) you don’t even need symbols. Don’t create them by hand, use a password generator (like this).
Use unique passwords. Every site or service you use needs to have its own. It will get stolen, eventually, but the damage will be contained to this site only. And no, oldman53 and oldman53# are NOT really different.
The two points above are basically impossible for a human to do. So you need to use a password manager. I use LastPass and I’m very happy with it. It costs around EUR 35 a year. If you want a free alternative use either Bitwarden or Firefox Lockwise.UPDATE: I’ve moved to Bitwarden Premium (just $10/year) and I’ve never been happier. I also recommend Bitwarden Free (+ Authy for 2FA) for my friends that don’t want to pay a cent.
When available, use two-factor authentication (2FA); you might also see it named as multi-factor authentication (MFA) or two-step validation (2SV, that’s what Amazon calls it). This is an absolute must. 2FA is when, in order to login to a service, you need a username, a password plus something more. Usually it’s an SMS, and that’s fine, but even better you can use an authenticator app. LastPass has its own, and its backed up in your LastPass account, but if you want a free alternative get either Authy or the one from Microsoft which is backed up in your Microsoft account. Obviously your authenticator backup needs to be well protected, so use two-factor for this as well -but a different one in case you lose access to it, so here SMS is better. UPDATE: Bitwarden Premium (not Free) can store 2FA in the same record where you store the site’s username & password. What’s really really really convenient with this is that, as soon as it fills in the password, it auto-copies the 2FA token to the clipboard, saving you the hassle. It doesn’t sound much but if you login to many different sites every day (as I do), you’ll love it.
How much effort is this?
I did this with my friend so I got a taste. Note that I’m in Switzerland and he’s in Greece, so he did the whole process with me giving instructions on the phone -which slowed us down considerably. But on the other hand I knew what had to be done, while less experienced users might be not so comfortable when doing this for the first time. We used Bitwarden + Authy.
It took us around 90 min to set up Bitwarden and Authy, and then add all his passwords there. We set it up on his laptop and two mobile phones.
It took another hour to change the password for the most important services (Gmail, Outlook.com, Paypal and Facebook) and to set up two-factor authentication.
Add to that another 45 minutes of training, for him to learn to use a password generator, the password manager and 2FA. Basically how to use really long and random passwords when signing up to web sites, how to save the passwords in Bitwarden, how to log in from the laptop or phone without having to type the password and how to add 2FA (where available) in Authy.
So that was, what, almost three and a half hours in total. It’s not trivial. But trust me, if you find yourself in his shoes you’ll wish you had done it already. It’s time well spent 🙂
Μόλις διάβασα ένα άρθρο του BBC σχετικά με τον διάσημο κατάσκοπο-προδότη της Αγγλίας, τον Kim Philby. Είναι τρομακτικό να διαβάζεις πόση δύναμη έχει, και που μπορεί να οδηγήσει, η ιδεοληψία:
“[Kim Philby’s] KGB handler next instructs him to get the top job by removing his boss, Felix Cowgill.”
“It was a very dirty story – but after all our work does imply getting dirty hands from time to time but we do it for a cause that is not dirty in any way,” Philby explains.
“I have to admit that was the most blatant intrigue against a man I rather liked and I admired but the instructions stood and nothing I could do would alter them.”
Για όσους ξέρουν ποιός είναι ο Kim Philby ή έχουν διαβάσει έστω και ένα μυθιστόρημα του John le Carré, το άρθρο του BBC είναι must.
(This one’s for IT guys, perticularly crypto geeks, source is Schneier’s blog)
NSA recently declassified a lectures book from 1973. It contains some real gems, such as these from pages 55/56:
KAG-1/SEC used to be the bible of US cryptographers, was held in every crypto-center and covered everything from message preparation to compromise reporting in considerable detail. While we viewed it as a model of clarity, this perception was not always shared in the real world. A frustrated Navy Chief stormed out of bis crypto-ccntcr on board a carrier at sea, banded KAG-1 to a sailor and jokingly said “Throw this dam’ thing overboard.” He did. Several ships thereafter steamed back and forth for several days, but never found it. Winds, tides, and currents were studied to predict where it might come ashore with results so ambitious as to offer little hope and, in fact, it was never recovered – at least by us.
This incident triggered an R 1 study on what happens to our documents in salt water. A tank was made, and a copy of KAG-1 immersed. It stayed there for a year or so with no sign of deterioration. Agitators were added to stimulate wave action for another few months, with still no appreciable effect. We never did find out how long such a document would last. Subsequent work, however, has shown that good paper is nearly impervious to salt water, apparently indefinitely. A visit to S2’s exhibit of materials recovered from the sea bottom will bear that out. There you can see perfectly legible codes that had been under water since World War II, together with extraordinarily well-preserved items of hardware and magnetic tape that had been on the bottom for many years. These facts add to the previously expressed skepticism about jettison as a way to get rid of our stuff unless at very great depths and in completely secret location. (Shortly after WWII, small Army training crypto-devices called the SIGFOY were disposed of beyond the 100 fathom curve off Norfolk. Some years later, they became prize souvenirs for beach combers as they began washing ashore.)
UNSOLVED PUZZLE – We used to store a lot of cryptomaterial in a warehouse at Ft. Holabird. It was fenced and protected by a 24-hour armed civilian guard. One evening, such a guard saw an individual inside the fence, evidently attempting to penetrate the warehouse. He drew his weapon, cried “Halt!” and led the individual to the guard shack and started to call in for help. About that time, the intruder started running, climbed the fence, and disappeared.
We asked the guard why he didn’t shoot – he said he was afraid he might hurt somebody.
CONFETTI – When we manufacture one-time tape, a by-product of the punching process is millions upon millions of tiny, perfectly circular pieces of paper called “chad” that come out of holes in the tape. This chad was collected in burn bags and disposed of. Someone thought it would make good public relations to give this stuff to high school kids for use as confetti at football games. Inevitably, one of the burn bags was not quite empty when the chad went in. At the bottom, were a couple of TOP SECRET key card book covers and a few assorted keys. They carried the impressive caveats of those days like “CRYPTO – CRYPTO-CLEARANCE REQUIRED” and were, to use a term earlier referred to, “fascinating” to the kids when they discovered them.
One of the girls, whose father happened to be an Army officer, tacked soine of this material on her souvenir board. When Daddy saw it, he spiralled upward. He decided that it must be destroyed immediately; but first made a photograph of it for the record. He tore it up, flushed it away, and reported in. With some difficulty, various cheerleaders and other students who had glommed on to some of this material were tracked down, and persuaded to part with it.
We no lonser issue confetti.
A History of U.S. Communications Security (Volumes I and II);
the David G. Boak Lectures, National Security Agency (NSA), 1973