Contrary to “normal” languages like C# or Java, Powershell is not a compiled language, but rather an interpreted one. This means that instead of using a compiler, the Powershell Scripting Runtime Environment reads and executes the code line-by-line during runtime.
That has well known advantages -for example, you can change code on the spot- and disadvantages -e.g. performance. But one major disadvantage is that there are no compiler errors. That means that if you forget to close a parenthesis or a bracket, nothing works. It’s the silliest of mistakes but still crashes everything.
With Powershell being used in non-interactive environments, like Azure Functions, it’s becoming all the more important to guard against such errors.
Fortunately, there is a solution for this. Microsoft has published the PSScriptAnalyzer module (link) which includes the Invoke-ScriptAnalyzer (link) command. Running this against your code, you get a list of warnings and errors:
The best things is, you can include this in your CI/CD pipelines, e.g. in Azure Devops or Github.
So here’s an example of an Azure Devops pipeline task that checks for ParseErrors (meaning, the script is not readable) and stops the build in case such an error is found:
#
# Source: DotJim blog (http://dandraka.com)
# Jim Andrakakis, October 2024
#
- task: PowerShell@2
  displayName: Check for Powershell parsing errors
  inputs:
    targetType: 'inline'
    errorActionPreference: 'stop'
    pwsh: true
    script: |
      Install-Module -Name PSScriptAnalyzer -Scope CurrentUser -Force
      Write-Host 'Performing code analysis using Microsoft Invoke-ScriptAnalyzer'
      $findings = Invoke-ScriptAnalyzer -Path '$(System.DefaultWorkingDirectory)' -Recurse -Severity ParseError,Error
      $findings | Format-List
      if (($findings | Where-Object { $_.Severity -eq 'ParseError' }).Count -gt 0) { Write-Warning "Parse error(s) were found, review analyser results."; exit 1 }
While Azure Devops is widely used, Microsoft’s backup solutions are surprisingly thin. With people depending on it, individuals and enterprises alike, you’d expect a bit more.
There are various tools around, but here’s my version in the form of a Powershell script. What it does is:
Connects to a specific Azure Devops project and repo.
Lists all branches, downloads them using git and zips them.
The zip, one for every branch, is named Backup_yyyy-MM-dd_branch.zip.
Here we’re not going to talk about this kind 😊 But that doesn’t mean it’s not important.
It happens quite often that a script you need to run needs access to a resource, and for this you need to provide a secret. It might be a password, a token, whatever.
The easy way is obviously to have them in the script as variables. Is that a good solution?
If you did not answer NO THAT’S HORRIBLE… please change your answer until you do.
Ok so you don’t want to leave it lying around in a script. You can ask at runtime, like this:
$token = Read-Host -Prompt "Please enter the connection token:" -AsSecureString
That’s definitely not as bad. But the follow up problem is, the user needs to type (or, most probably, copy-paste) the secret every time they run the script. Where do the users store their secrets? Are you nudging them to store it in a notepad file for convenience?
In order to keep our systems safe, we need a way that is both secure and convenient.
That’s why using the Windows Credential Manager is a much, much better way. The users only have to recover the secret once, and then they have it stored in a safe way.
Here’s an example of how you can save the secret in Windows Credential manager. It uses the CredentialManager module.
# === DO NOT SAVE THIS SCRIPT ===

# How to save a secret

# PREREQUISITE:
# Install-Module CredentialManager -Scope CurrentUser

$secretName = 'myAzureServiceBusToken' # or whatever

New-StoredCredential -Target $secretName -Username 'myusername' -Pass 'mysecret' -Persist LocalMachine
And here’s how you can recover and use it:
# How to use the secret

# PREREQUISITE:
# Install-Module CredentialManager -Scope CurrentUser

$secretName = 'myAzureServiceBusToken' # or whatever

$cred=Get-StoredCredential -Target $secretName
$userName = $cred.UserName
$secret = $cred.GetNetworkCredential().Password

# do whatever you need with the secret
Just for completeness, here’s an example of how to call a REST API with this secret. I imagine that’s one of the most common use cases.
Powershell offers a number of Active Directory (AD for short) commandlets to make an AD admin’s life a little easier. For example, if you need to get a list of members from an AD group, you can use something like:
The problem is that this doesn’t work everywhere. The ActiveDirectory module is not a “normal” one you can install with Install-Module; instead, you need to install a Windows feature, either from Control Panel or by using the Add-WindowsCapability commandlet.
But you don’t have to use this module. You can use something that’s available everywhere, the adsiSearcher type accelerator.
So here are a couple of scripts I came up with (credits where they’redue). The first searches through all groups, finds all the ones that match a string and lists all their members.
#
# Source: DotJim blog (https://dandraka.com)
# Jim Andrakakis, January 2024
#

# ===== Parameters =====

param(
    [string]$searchString = 'accounting'
)

# ======================

Clear-Host
$ErrorActionPreference='Stop'

# === Get all groups ===
$objSearcher=[adsisearcher]'(&(objectCategory=group))'
$objSearcher.PageSize = 20000 # may need to adjust, though should be enough for most cases

# specify properties to include
$colProplist = "name"
foreach ($i in $colPropList) { $objSearcher.PropertiesToLoad.Add($i) | out-null }

$colResults = $objSearcher.FindAll()

foreach ($objResult in $colResults)
{
    #group name
    $group = $objResult
    $groupname = ($objResult.Properties).name

    if (-not ($groupname[0].ToLower().Contains($searchString.ToLower()))) {
        continue
    }

    Write-Host "Members of $groupname [$($group.Path)]"

    $Group = [ADSI]$group.Path
    $Group.Member | ForEach-Object {
        $Searcher = [adsisearcher]"(distinguishedname=$_)"
        $member = $searcher.FindOne()
        $userName = $member.Properties.samaccountname
        $name = $member.Properties.displayname

        Write-Host "`t[$userName]`t$name"
    }
}
The second displays all details of all users whose name matches a substring.
#
# Source: DotJim blog (https://dandraka.com)
# Jim Andrakakis, January 2024
#

# ===== Parameters =====

param(
    [string]$searchString = 'Papadomanolakis'
)

# ======================

Clear-Host
$ErrorActionPreference='Stop'

# === Get all groups ===
$objSearcher=[adsisearcher]"(&(objectClass=user)(displayname=*$($searchString)*))"
$objSearcher.PageSize = 20000 # may need to adjust, though should be enough for most cases
#$objSearcher.FindOne().Properties.Keys
$objSearcher.FindAll() | % { $_.Properties }
And the third one is a brilliant one-liner by Jos Lieben that lists all groups of a user.
$userName = $env:USERNAME # change if different user needed
([ADSISEARCHER]"(member:1.2.840.113556.1.4.1941:=$(([ADSISEARCHER]"samaccountname=$userName").FindOne().Properties.distinguishedname))").FindAll().Properties.distinguishedname -replace '^CN=([^,]+).+$','$1'
As part of my job, this is something I use a lot. And the thing is, it’s quite easy, it’s just an Invoke-WebRequest. Here’s how I do it:
#
# Source: DotJim blog (https://dandraka.com)
# Jim Andrakakis, January 2023
#

# ===== Parameters =====

param(
    [string]$fileName = 'C:\temp\uploadinfo.json',
    [string]$rqServer = 'http://myServer:15672', # better use HTTPS though
    [string]$rqVhostName = 'myVhost',
    [string]$rqQueueName = 'myQueue',
    [string]$rqExchangeName = 'amq.default', # or your exchange name
    [string]$rqUsername = 'myUser', # this user needs at least 'Management' permissions to post to the REST API
    [string]$rqPassword = 'myPass',
	# RabbitMQ has a recommended message size limit of 128 MB
    # See https://www.cloudamqp.com/blog/what-is-the-message-size-limit-in-rabbitmq.html
    # But of course depending on your app you might want to set it lower
	[int]$rqMessageLimitMB = 128
)

# ======================

Clear-Host
$ErrorActionPreference = 'Stop'
$WarningPreference = 'Continue'

[string]$rqUrl = "$rqServer/api/exchanges/$rqVhostName/$rqExchangeName/publish"

# Sanity check
if (-not (Test-Path $fileName)) {
    Write-Error "File $fileName was not found"
}

# Check RabbitMQ size limit
[int]$rqMessageLimit = $rqMessageLimitMB * 1024 * 1024
[long]$fileSize = (Get-Item -Path $fileName).Length
if ($fileSize -gt $rqMessageLimit) {
    Write-Error "File $fileName is bigger that the maximum size allowed by RabbitMQ ($rqMessageLimitMB MB)"
}

$plainCredentials = "$($rqUsername):$($rqPassword)"
$encodedCredentials = [Convert]::ToBase64String([System.Text.Encoding]::UTF8.GetBytes($plainCredentials))
$authHeader = "Basic " + $encodedCredentials

[string]$content = Get-Content -Path $fileName -Encoding UTF8
$msgBase64 = [Convert]::ToBase64String([System.Text.Encoding]::UTF8.GetBytes($content))
$json = "{`"properties`":{`"content_type`":`"application/json`",`"delivery_mode`":2},`"routing_key`":`"$rqQueueName`",`"payload`":`"$msgBase64`",`"payload_encoding`":`"base64`"}"
$resp = Invoke-WebRequest -Method Post -Uri $rqUrl -Headers @{'Authorization'= $authHeader} -Body $json
if([math]::Floor($resp.StatusCode/100) -ne 2) {
    Write-Error "File $fileName could not be posted, error $($resp.BaseResponse)"
}

Write-Host "File $fileName was posted to $rqUrl"
Who among us hasn’t found him- or herself in this very awkward position: committing a config or code file with secrets (such as passwords or API keys) and then semi-panicked googling how to delete it from source control.
Been there and let me tell you the easiest way to delete it: copy all the code on disk, delete the repository completely and then re-create it.
(if this is not an option, well, there’s still a way but with much more work and risk, so do keep that code backup around!)
But you know what’s even better? That’s right, avoid this in the first place! That’s why Git hooks are so useful: they work without you neededing to remember to check your config files every time.
So here’s my solution to this:
In the repository, go to .git/hooks and rename pre-commit.sample to pre-commit (i.e. remove the extension)
Open pre-commit with a text editor and replace its contents with the following:
Add a new directory on the root of the repository named hooks.
Inside this, add a text file named pre-commit.ps1 with the following code:
#
# Source: DotJim blog (http://dandraka.com)
# Jim Andrakakis, July 2022
#
Clear-Host
$ErrorActionPreference='Stop'

# ===== Change here =====
$listOfExtensions=@('*.xml','*.config')
$listOfSecretNodes=@('username','password','clientid','secret','connectionstring')
$acceptableString='lalala'
# ===== Change here =====

$codePath = (Get-Item -Path $PSScriptRoot).Parent.Parent.FullName

$errorList=New-Object -TypeName 'System.Collections.ArrayList'

foreach($ext in $listOfExtensions) {
    $list = Get-ChildItem -Path $codePath -Recurse -Filter $ext

    foreach($file in $list) {
        $fileName = $file.FullName
        if ($fileName.Contains('\bin\')) {
            continue
        }
        Write-Host "Checking $fileName for secrets"
        [xml]$xml=[xml]((Get-Content -Path $fileName).ToLowerInvariant())
        foreach($secretName in $listOfSecretNodes) {
            $nodes = $xml.SelectNodes("//*[contains(local-name(), '$secretName')]")
            foreach($node in $nodes) {
                if ($node.InnerText.ToLowerInvariant() -ne $acceptableString) {
                    $str = "[$fileName] $($node.Name) contains text other than '$acceptableString', please replace this with $acceptableString before commiting."
                    $errorList.Add($str) | Out-Null
                    Write-Warning $str
                }
            }
        }
    }
}

if ($errorList.Count -gt 0) {
    Write-Error 'Commit cancelled, please correct before commiting.'
}
So there you have it. I’m getting automatically stopped every time I tried to commit any .xml or .config file that contains a node with a name that contains username, password, clientid, secret or connectionstring, whenever the value of it is not ‘lalala’.
Obviously the extensions, node names and acceptable string can be changed at the top of the script. You can also change this quite easily to check JSON files as well.
Also note that this works on Windows (because of the Powershell path in the pre-commit hook) but with a minor change in the pre-commit bash script, you should be able to make it work cross-platform with Powershell core. I haven’t tested it but it should be:
Let’s start from the very beginning. First, I’ll explain a few things you’ll hear often. A lot of these words can seem daunting but actually are quite simple. Then we get down to the nitty gritty.
I DON’T WANT TO DO THIS WHY DO I NEED TO DO THIS???!??!
Because there are some things that you 1) want to be able to do on the internet but 2) don’t want other people to be able do (at least not without you knowing).
You don’t want other people to move money from your bank account. Or buy things with your credit card. You get the idea.
But but but I already have a password!
Yes, you do. But there are some problems.
If you’re, well, human, you can remember some things but not many and not very well (read this if you don’t believe me). And it’s 2021, if you don’t live under a rock you have at the very least 10-20 accounts in different services, like your bank, your email etc etc. Try to count them and write in the comments how many you found 😊
The other problem is: criminals steal data from these services. A lot. Like, in the billions. Estee Lauder had a breach on February 2020 where 440 million records -data about people- were stolen. MGM Resorts, which you know from the casino in “Ocean’s 11”, had personal information about more than 10 million guests stolen. And these are just 2 of the around 3000 data breaches that were reported in 2020 in the US alone.
What this means is that your password will get stolen and there’s nothing you can do about it. Well, almost nothing. You can and should do 3 things:
Have a unique password per service. This way, when your H&M password is stolen, it cannot be used to pay from your PayPal.
Use random passwords. For crying out loud, do not use your phone number. You think that adding a few letters here and there makes it safe. It does not. A computer with a program you can download for free can crack your “safe” password in like an hour. The password must be long and random, something like g5D9C467YxeEfAmqL. You get the idea.
Use 2-factor authentication. Since this post is already long, I’ll get to this in a later one.
What does “authentication” mean? And what are these “credentials” I keep hearing about?
Credentials just means whatever you need to give to a service, like a web site, so that it checks it’s really you. Some of it is secret, some of it is not. Usually it’s a username and a password but it might be more, like your fingerprint or a code that you receive in your phone.
Authentication is just the process that checks the credentials and lets you in (or not).
What’s a password manager?
It’s a program that stores your credentials and helps you use them. Because your passwords must be long, it’s tedious to have to type them yourself. So the password manager for example can auto-fill them, or you can copy-paste them, in your e-banking web site.
Ok, ok, I’ll do it, but which one should I use?
There are many good password managers you can use like 1Password, LastPass, Devolutions, NordPass and others. Here I’ll use my favourite one which is Bitwarden, because it’s arguably the best free one and in my humble opinion the easiest to use.
Obviously this is just one way to do it; it works and it’s secure, but of course you can change things, for example use a different program. The main things to consider if you decide to use another one is:
It should have both a computer as well as a smartphone application.
It should be able to synchronize your credentials between them.
It should be as simple to use as possible.
And how much time will it take?
Realistically, assuming you’re an average computer and smartphone user, for 5-10 web sites you’ll need around a couple of hours from start to finish. Obviously if you have dozens it will take more -not proportionally- but it’s also worth more. If you get stuck, write me in the comments and I’ll do my best to help.
UPDATE: some friends suggested that instead of doing all your sites at once, it makes the effort more manageable to do the most important ones first -e-banking, email etc. The rest you can do when you come across them in everyday use.
Now I’ll explain how you do it in your computer and smartphone. Ready, set, go!
We’ll start from your computer because usually it’s easier to create the account there. Then we’ll continue to your smartphone. But the very first thing you need to do is grab a piece of old fashioned paper.
Step 1: Write a password and a 6 digit code.
Get a paper. Yes the traditional one!
Not necessarily a post-it, but this will do as well
Write 20 or more random numbers and letters, both lower and capital. Something like 6xTzHx41jKQ3yg48FeR9sAb. This will be your password.
You don’t need to remember this.
In the same piece of paper write 6 random numbers. DO NOT USE ANYTHING REAL OR EVEN CLOSE TO IT LIKE YOUR BIRTHDAY OR YOUR POSTCODE OR YOUR PHONE, NOT EVEN CHANGED. This will be your unlock code.
This code will be the one and only thing you need to learn by heart.
Keep this paper safe in your desk at home but NOT in your computer -don’t take a photo of it or write it in a Word file.
Step 2: Create your Bitwarden account
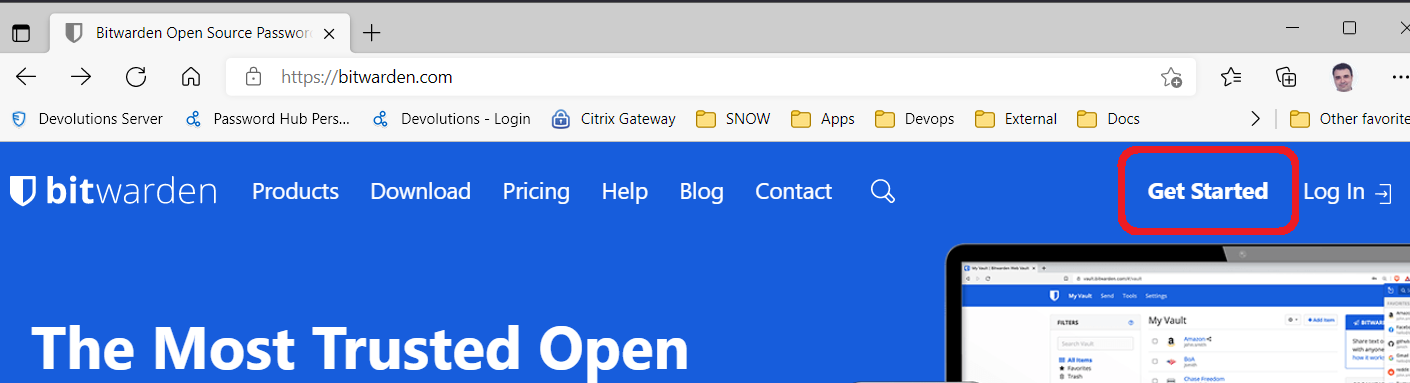
On your computer, go to bitwarden.com and click “Get started”.
Fill in the form, it’s really simple. Use the password you wrote on the paper.
Step 3: Install the browser extension
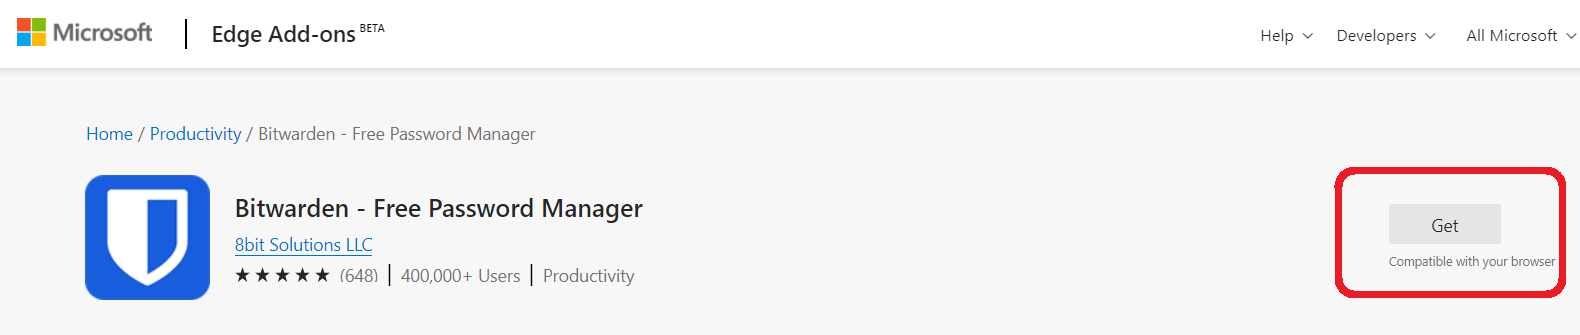
Still on your computer, open your favourite browser -Firefox, Chrome, Edge, Opera, whatever- go to the bitwarden extension and install it.
In case you’re using anything else, just google “bitwarden <browser name>” and you’ll find it.
NOTE: As you’ll see, about the only annoying thing with Bitwarden is that if you click outside of it before you save your changes, it closes and loses your input. There’s a solution for this: you can click the “Pop out” button” and then it opens as a separate window. The “Pop up” button is this one:
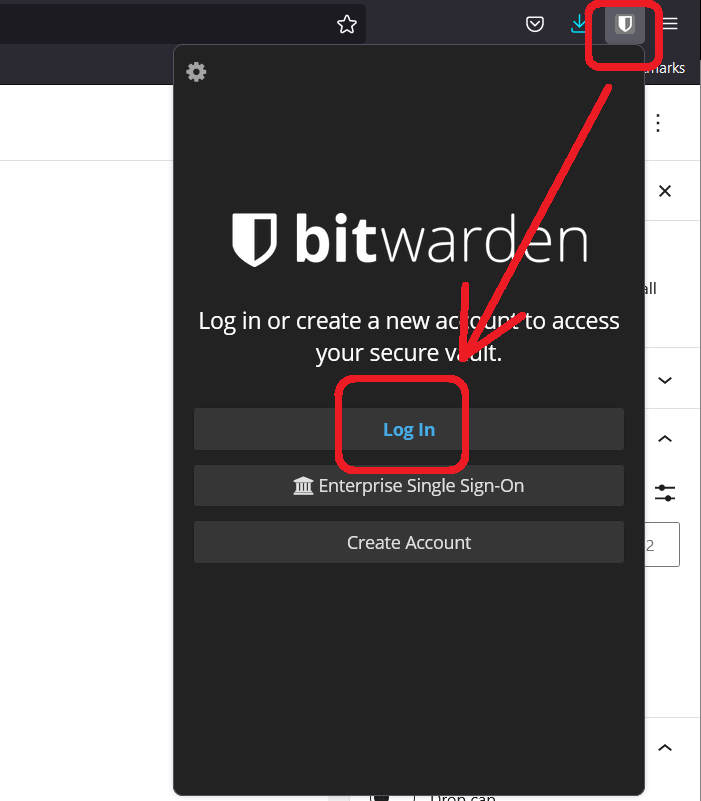
When the extension is installed, you’ll get the Bitwarden shield icon on the top right corner of your browser. Click it and fill in your email and password.
Once you log in you see your list of passwords. This a called your “vault”. For now, it’s obviously empty.
Click “Settings”, then “Unlock with pin”. Enter the 6 numbers you wrote on the paper and uncheck the “lock with master password…” check box.
Step 4: Store your credentials
If you’ve done so far, great job! Now it’s the time to start storing your passwords, one by one.
Click the shield icon of Bitwarden, then the plus icon on the top right corner.
Start with your email. Enter the name, username and password -the ones you have already. Add also the URL you use to access the site. Then click “Save”.
One by one, add all the sites and other services you have. This will probably take some time; my list has more than 400 entries 😊
Step 5: Try it
So all of this is supposed to help you right? Here’s how it helps you login. Say you want to log in to your email for example.
Click the shield icon of Bitwarden, click “My vault” and click the little arrow of the site. You’ll see that it takes you there.
In your email site, click “Sign in” or “Login” or whatever it has. Right click in the username or password and select Bitwarden > Auto-fill > your site name. Then click Next or Login or whatever it has.
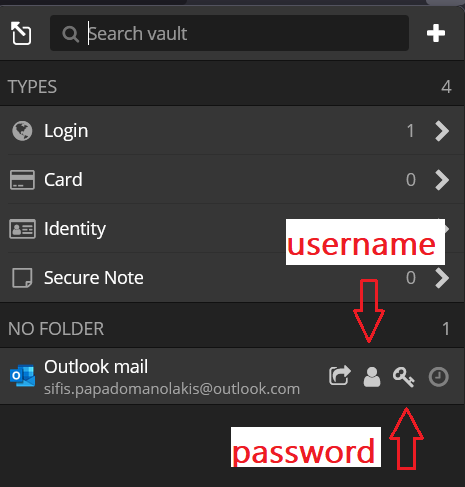
If for whatever reason right click doesn’t find the site, there’s another way that’s not as easy but works every time. From “My vault” click the head icon to copy the username, then paste it in the site, then click the key icon to copy the password, then paste it in the site.
After doing it a few times, you’ll get the hang of it; it will feel very easy very quickly.
Step 6: Change your passwords
Until now you’ve done great, but we’re still using our old passwords. Now it’s the time to make them big and hard 😉
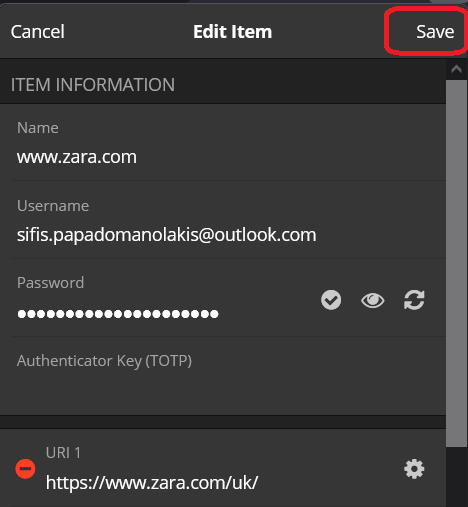
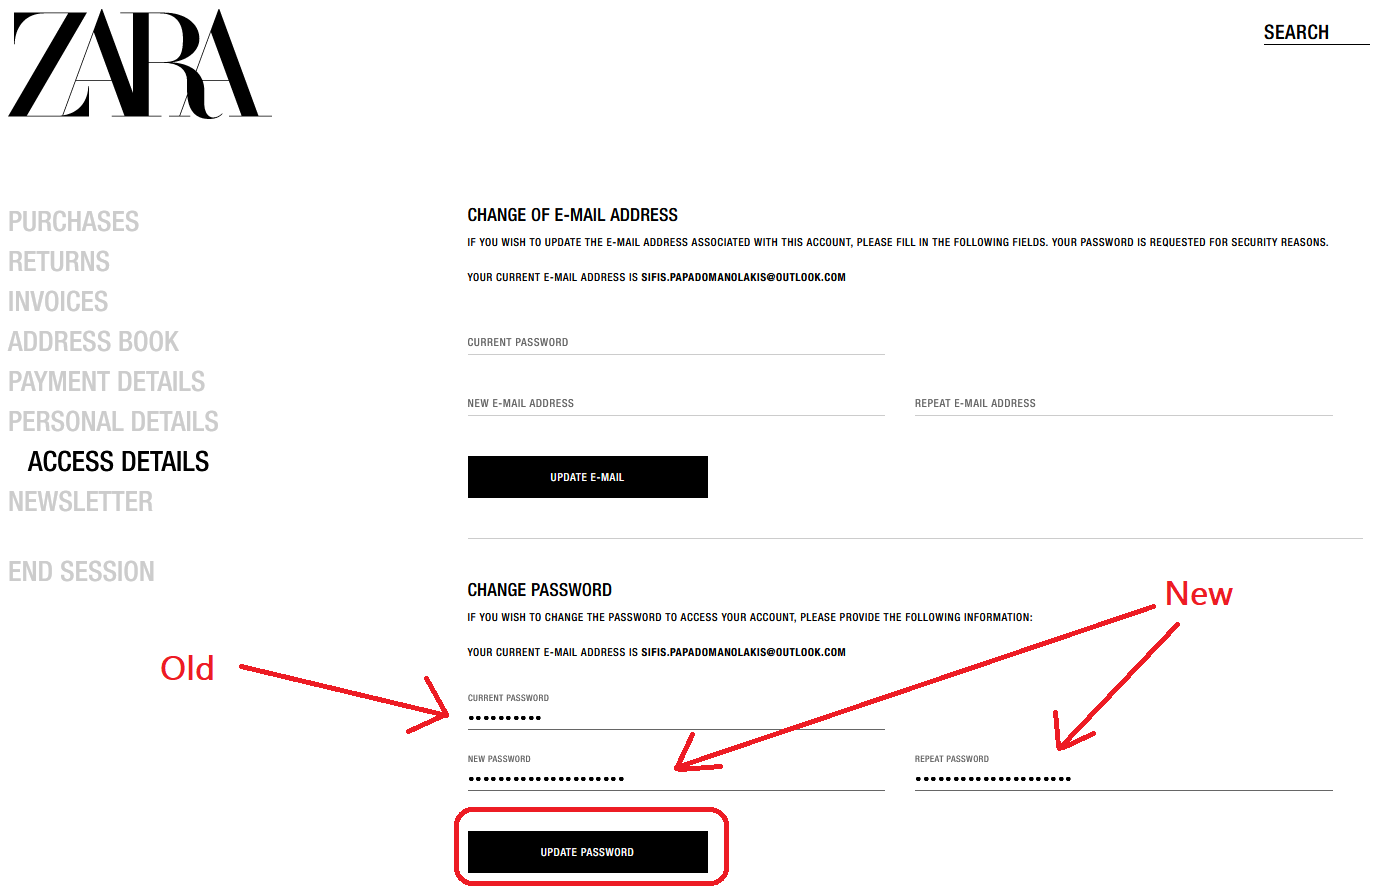
The exact process differs slightly for every site, obviously, but not much. In this example, I’ll use a popular e-shop, Zara UK.
Go to your profile and go to change password:
In the bitwarden “My vault” click the key icon of the site (see above) to copy the existing password. Paste it in the “Current password” box of the web site.
Then go in the bitwarden “My vault” again and click somewhere in the middle of the site name. This will open the entry. Click Edit on the top right corner.
Click the double arrow next to the password and click “yes” in the “overwrite password” question. Slide the length of the password to something over 17, click “regenerate” and then “select”.
Click “Save” to save the new password.
Now go to “My vault” again, click the key icon to copy the new password, go to the web site and paste it twice. Then click “Update password” or whatever button is there.
The first time you do it will be cumbersome, but after the first 2-3 sites, it will feel really easy.
If you’ve reached this far, congratulations 🥳🎉👏 You’ve done the hard work! The last thing to do is install the app on your smartphone so you can use it there too. Let’s go!
Here we get to the fun part -well, if not fun, certainly the easiest and most useful. I’ll give screenshots for iPhone, because that’s what I have, but for Android it’s almost the same.
Step 1: Install the Bitwarden App
Go to your App Store (or Play Store for Android), find Bitwarden and install it.
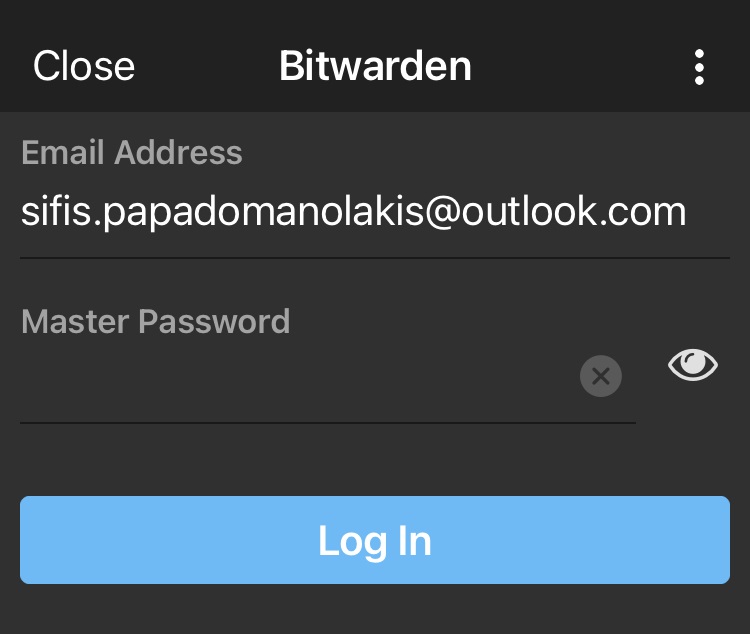
Step 2: Login
Open the app, click Log In and fill in the email and password (the one you wrote on the paper).
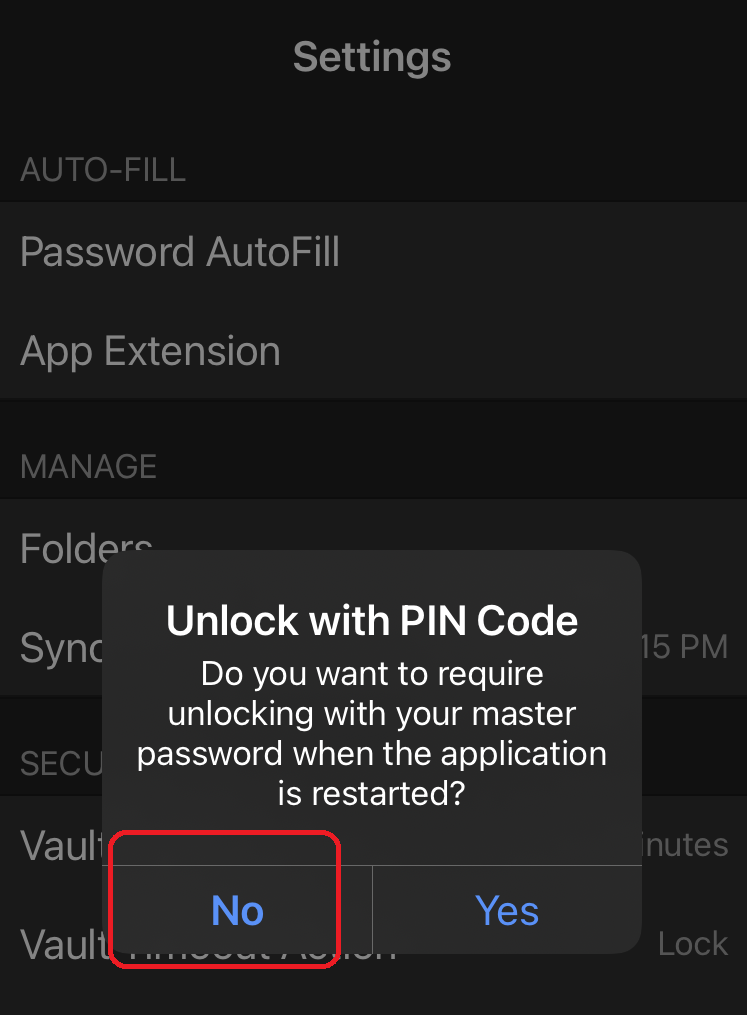
Go to Settings and press “Unlock with PIN code”. Enter the 6 digit number you wrote on the paper and select “No”.
We’re ready to use it!
Step 3: Use it to login to sites
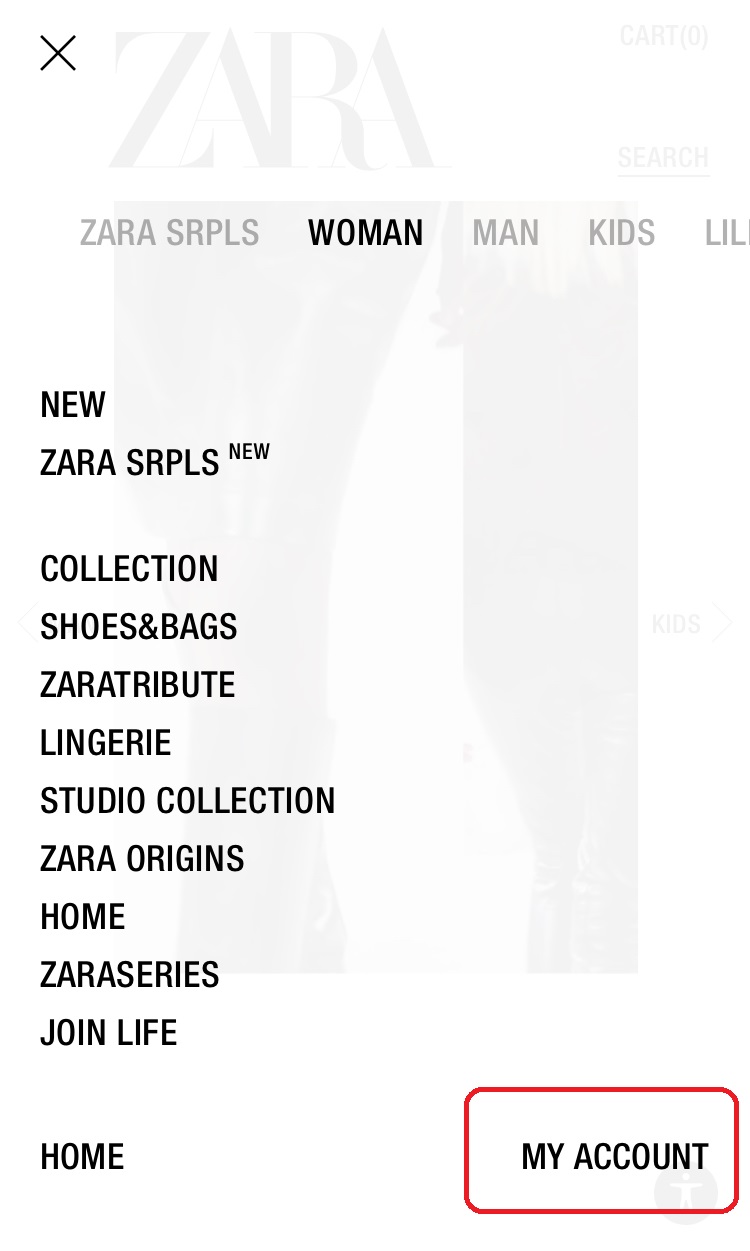
Let’s try to use the browser in our smartphone to login to Zara UK. Navigate to the web site and click Login, or My Account or whatever it has:
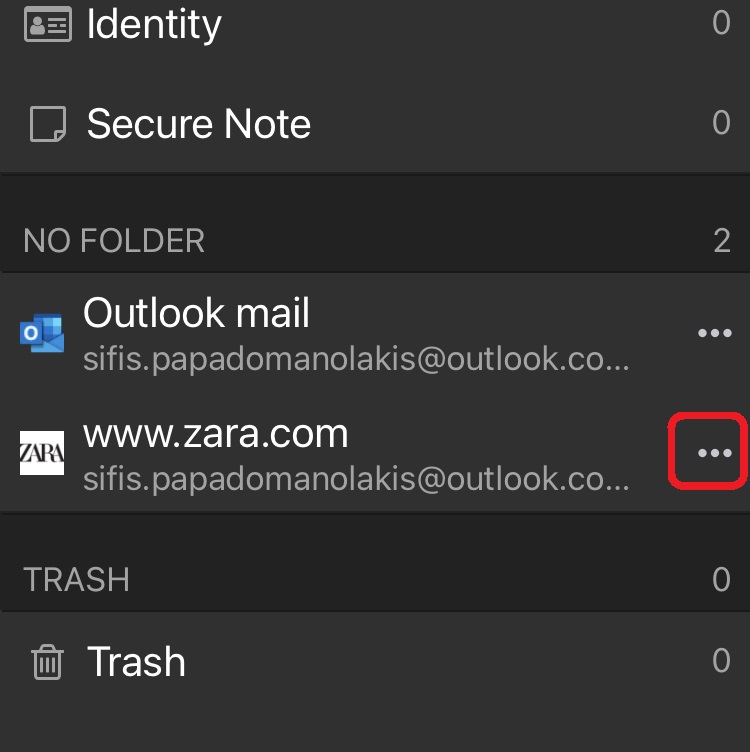
Now switch to Bitwarden (you might need to unlock it with your 6 digit code), find the site, press the 3 dots and click Copy Username.
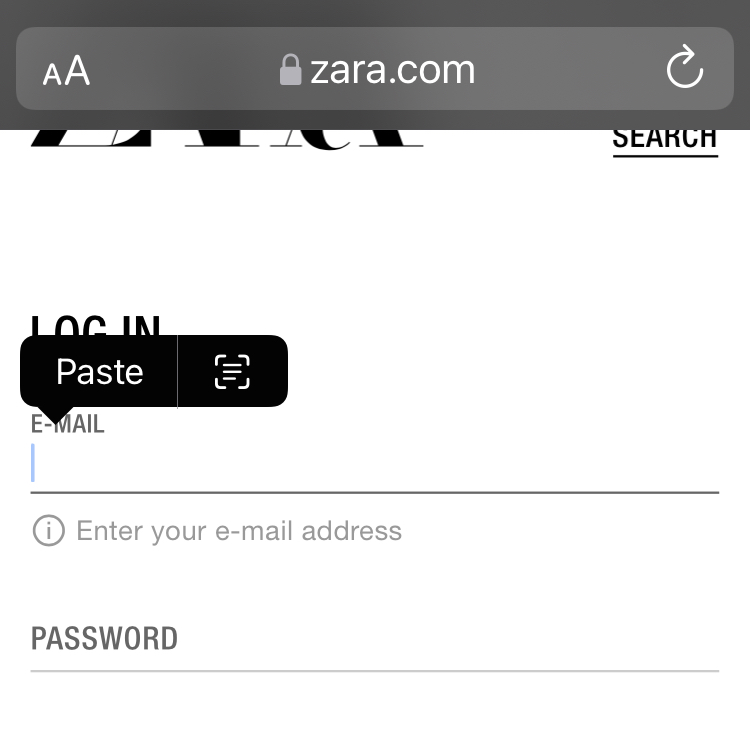
Switch to the browser, tap in the username box and paste the username.
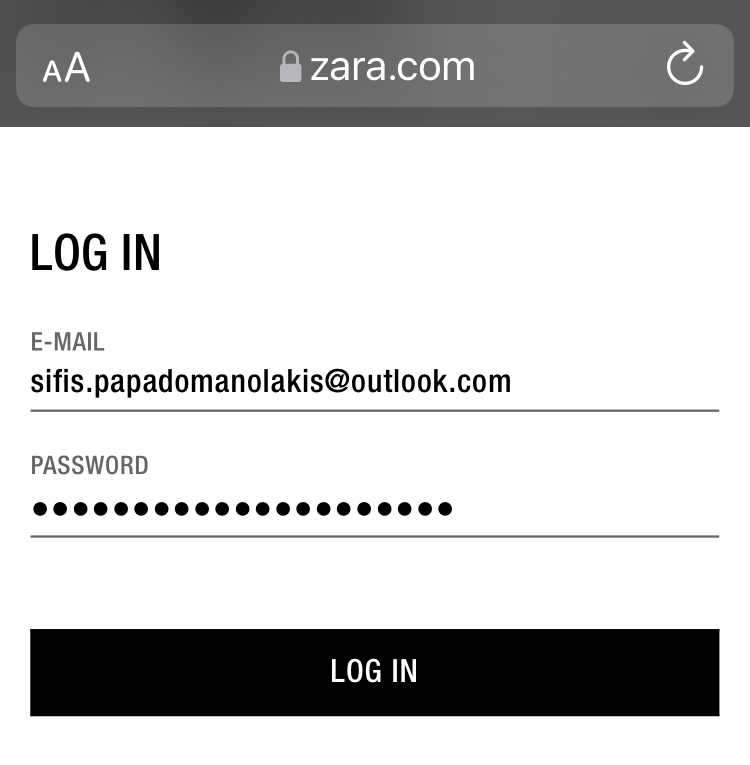
Repeat the same steps for the password and click Log In.
Ta da! We’re in!
That’s all folks
This was what you have to do to get started and work with Bitwarden. It’s not an exhaustive guide, mind you, there are more to it. But it covers the most important part: securely creating, storing and using unique passwords that are impossible to guess.
I hope this works for you. If you have any questions or suggestions, I’ll be more than happy to discuss in the comments!
Have fun 😊
Software, Greece, Switzerland. And coffee. LOTS of coffee !