Tag Archives: development

C#: If your Data Access Layer leaks, you’re gonna get wet (here’s how to do it right)

So the other day I’m doing a code review in an enterprise application. The goal was to switch the data storage from SharePoint Online Lists to Azure SQL database tables. “Easy,” I thought. “It’s just a change in the Data Access Layer (DAL)”.

Long story short, I started reviewing the source code and… wasn’t amused. This was (a small sample of) the problem:

AdminService.cs
C#
public class AdminService
{
public AdminService(ILogger<AdminService> logger, ISharePointService sharePointService, IConfiguration configuration)
{
// initialization code
}
public async Task<Metadata> AddEmployeeDirectoryItem(PnPContext adminContext, PersonCreated personCreated)
{
// Add Employee Directory stuff
}
// etc etc
}

I mean, dear programmer, look. You want to add a directory related to an employee. I get it. But why is the PnPContext sitting there in the method signature like an uninvited guest at a wedding?

This is what we call a “Leaky Abstraction.” Your Data Access Layer (DAL) is leaking its internal stuff all over your business logic. Depending on the case, today it’s Sharepoint, tomorrow it’s SQL Server, and the day after it’s a carrier pigeon. If your business logic knows in what kind of medium your data is stored in, you’re in for a world of hurt.

The Problem: When your DAL tells too much

The core issue is coupling. When you pass an SqlConnection, an SqlDataReader, or a SharePoint PnPContext directly into your business services, you are essentially tattooing your data vendor onto your forehead.

If you leak these details:

  1. You can’t switch providers: Moving from SQL to SharePoint to Oracle to clay tablets becomes a “rewrite everything” project instead of a “change one class” task.
  2. Testing is a nightmare: You can’t unit test your business logic without a Sharepoint, SQL Server etc. running, because your methods demand a real connection.
  3. Code smell: Your business logic should care about what is being saved, not how the connection string is formatted.

The “Wrong” Way: The Leaky Bucket

Take a look at this example. It’s the kind of code that works fine during development, works fine in UAT, but makes you want to retire when requirements change.

InvoiceLogic.cs
C#
// Somewhere in the Business Logic Layer
public void ProcessInvoice(int invoiceId, string connectionString)
{
using (SqlConnection conn = new SqlConnection(connectionString))
{
conn.Open();
// Why is my Business Logic managing SQL connections?!
var cmd = new SqlCommand("SELECT * FROM Invoices WHERE Id = @id", conn);
cmd.Parameters.AddWithValue("@id", invoiceId);
// ... process logic ...
}
}

Did you notice? The business logic is doing the heavy lifting of database management. If the boss says “We’re moving to an OData API,” you have to touch every single file in your project.

The Solution: The Repository Pattern

So how do you do this correctly?

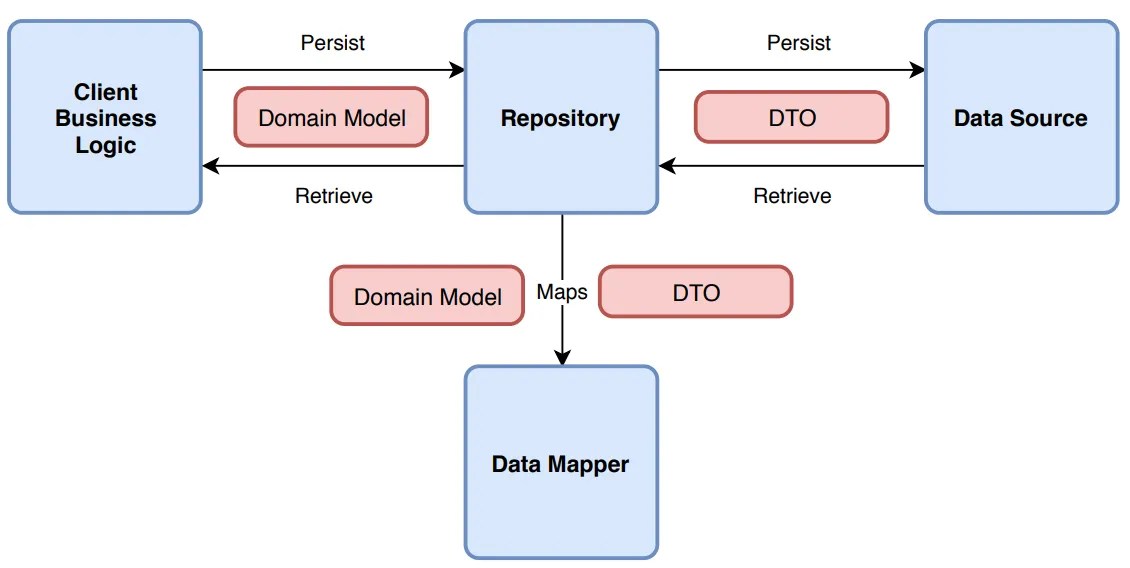
First of all, it’s a good idea not to reinvent the wheel. You can use the Repository Pattern. Think of a Repository as a mediator between the domain and the data mapping layers. It acts like an in-memory collection of domain objects.

Your business logic should talk to an Interface, and that interface should speak the language of your business (Invoices, Customers, Files), not the language of your storage (Tables, Blobs, Transactions).

The Refactored Way: Clean and Dry

Let’s fix that mess. First, we define what we want to do, without mentioning the data storage medium. Here’s an example of an invoice processor:

1. Clean business objects

Invoice.cs
C#
public class Invoice
{
public int Id { get; set; }
public string CustomerName { get; set; }
public decimal Amount { get; set; }
public DateTime IssueDate { get; set; }
public List<InvoiceItem> Items { get; set; } = new List<InvoiceItem>();
// You can add business logic here...
public void ApplyDiscount(decimal percentage)
{
Amount -= Amount * (percentage / 100);
}
// ...but NEVER data access logic!
}
public class InvoiceItem
{
public string Description { get; set; }
public decimal Price { get; set; }
}

2. Repository Interface

IInvoiceRepository.cs
C#
public interface IInvoiceRepository
{
Invoice GetById(int id);
void Save(Invoice invoice);
}

Notice how the interface uses only basic types (such as int, string etc) or our clean business objects. It should NEVER use data store-specific types, such as DataRow.

3. The Business Logic (the right way)

Now, the business logic is blissfully ignorant. It’s like a person ordering a pizza who doesn’t care if the oven is electric or wood-fired.

InvoiceService.cs
C#
public class InvoiceService
{
private readonly IInvoiceRepository _repo;
public InvoiceService(IInvoiceRepository repo)
{
_repo = repo; // Dependency Injection!
}
public void ProcessInvoice(int invoiceId)
{
var invoice = _repo.GetById(invoiceId);
// Do actual business work here...
_repo.Save(invoice);
}
}

3. Data layer implementation

Now, you can have a SqlInvoiceRepository for today, and a SharePointInvoiceRepository for tomorrow. The rest of your app won’t even notice the difference. All they need is to implement IInvoiceRepository.

Final Thoughts

It’s tempting to just “pass the connection” because it’s faster. It’s easy to forget that code lives longer than infrastructure.

But in any case, be careful to consider your future self (not to mention others that might maintain your code). Is your software supposed to grow? A good place to start is decoupling.

Whatever you do, PLEASE PLEASE PLEASE DON’T LEAK YOUR DAL DETAILS.

Stop CI/CD pipeline if a Powershell script contains errors

Contrary to “normal” languages like C# or Java, Powershell is not a compiled language, but rather an interpreted one. This means that instead of using a compiler, the Powershell Scripting Runtime Environment reads and executes the code line-by-line during runtime.

That has well known advantages -for example, you can change code on the spot- and disadvantages -e.g. performance. But one major disadvantage is that there are no compiler errors. That means that if you forget to close a parenthesis or a bracket, nothing works. It’s the silliest of mistakes but still crashes everything.

With Powershell being used in non-interactive environments, like Azure Functions, it’s becoming all the more important to guard against such errors.

Fortunately, there is a solution for this. Microsoft has published the PSScriptAnalyzer module (link) which includes the Invoke-ScriptAnalyzer (link) command. Running this against your code, you get a list of warnings and errors:

The best things is, you can include this in your CI/CD pipelines, e.g. in Azure Devops or Github.

So here’s an example of an Azure Devops pipeline task that checks for ParseErrors (meaning, the script is not readable) and stops the build in case such an error is found:

#
# Source: DotJim blog (http://dandraka.com)
# Jim Andrakakis, October 2024
#
- task: PowerShell@2
  displayName: Check for Powershell parsing errors
  inputs:
    targetType: 'inline'
    errorActionPreference: 'stop'
    pwsh: true
    script: | 
      Install-Module -Name PSScriptAnalyzer -Scope CurrentUser -Force
      Write-Host 'Performing code analysis using Microsoft Invoke-ScriptAnalyzer'
      $findings = Invoke-ScriptAnalyzer -Path '$(System.DefaultWorkingDirectory)' -Recurse -Severity ParseError,Error
      $findings | Format-List
      if (($findings | Where-Object { $_.Severity -eq 'ParseError' }).Count -gt 0) { Write-Warning "Parse error(s) were found, review analyser results."; exit 1 }   

Enjoy 😊

How to get a backup of your Azure Devops repository including all branches

While Azure Devops is widely used, Microsoft’s backup solutions are surprisingly thin. With people depending on it, individuals and enterprises alike, you’d expect a bit more.

There are various tools around, but here’s my version in the form of a Powershell script. What it does is:

  • Connects to a specific Azure Devops project and repo.
  • Lists all branches, downloads them using git and zips them.
  • The zip, one for every branch, is named Backup_yyyy-MM-dd_branch.zip.

Prerequisites are not much, but:

  • You need git installed and
  • you need a PAT with read access to your code (instructions here).

So here’s the script:

#
# Source: DotJim blog (https://dandraka.com)
# Jim Andrakakis, October 2024
# Updated September 2025, fix for projects and orgs containing spaces
#

# BackupBranches.ps1

param (
    [string]$organization = "MYORG",
    [string]$project = "MYPROJECT",
    [string]$repository = "MYREPO",
    [string]$backupFolder = "C:\Temp\DevOpsBranches",    
	[string]$branchFilter = "" # leave empty for all branches
)

Clear-Host
$ErrorActionPreference='Stop'
 
$pat = Read-Host -MaskInput -Prompt "Enter Personal Access Token for $($env:USERNAME) and $($project)/$($repository)"
$base64AuthInfo = [Convert]::ToBase64String([Text.Encoding]::ASCII.GetBytes(":$pat"))
 
$tempFolder = Join-Path $backupFolder $repository
$repoNoSpace = $repository.Replace(' ','%20')
$projNoSpace = $project.Replace(' ','%20')
 
Write-Host "[$([datetime]::Now.ToString('yyyy-MM-dd HH:mm:ss'))] Starting, output directory is $tempFolder"
 
# Ensure temp folder exists
if (-not (Test-Path -Path $tempFolder)) {
    New-Item -Path $tempFolder -ItemType Directory | Out-Null
}
 
# API URL for branches
$branchesApiUrl = "https://dev.azure.com/$organization/$projNoSpace/_apis/git/repositories/$repoNoSpace/refs?filter=heads/&api-version=6.0"
 
# Get all branches from the repository
$response = Invoke-RestMethod -Uri $branchesApiUrl -Headers @{Authorization=("Basic {0}" -f $base64AuthInfo)}
 
$branchList = $response.value | Sort-Object -Property name
 
# Iterate through each branch
foreach ($branch in $branchList) {
	try {
		$branchName = $branch.name -replace "refs/heads/", ""

		# branch filter, if any
		if (-not ([string]::IsNullOrWhiteSpace($branchFilter)) -and ($branchName -notlike "*$branchFilter*")) {
			continue
		}
	 
		# Define the folder for the branch
		$branchNameStrilized = "$($branchName.Replace('/','_').Replace(' ','_'))"
		$branchFolder = "$tempFolder\$branchNameStrilized"
		 
		# Remove the folder if it exists from previous runs
		if (Test-Path -Path $branchFolder) {
			Remove-Item -Recurse -Force $branchFolder
		}
	 
		# Clone the specific branch
		$gitUrl = "https://dev.azure.com/$organization/$projNoSpace/_git/$repoNoSpace"
		Write-Host "Cloning branch '$branchName' from $gitUrl to $branchFolder"
		$gitResp = [string] (& git clone --branch $branchName --single-branch $gitUrl $branchFolder 2>&1)
		if ($gitResp -like "*fatal*") {
			Write-Error "Error cloning branch '$branchName': $gitResp"
		}
	 
		# Zip the branch folder
		$backupDate = [datetime]::Now.ToString('yyyy-MM-dd')
		$zipFilePath = "$tempFolder\Backup_$($backupDate)_$($branchNameStrilized).zip"
		if (Test-Path $zipFilePath) {
			Remove-Item $zipFilePath
		}
		Compress-Archive -CompressionLevel Fastest -Path "$branchFolder\*" -DestinationPath $zipFilePath
	 
		Write-Host "Branch '$branchName' zipped to $zipFilePath"
	 
		# Clean up branch folder after zipping
		Remove-Item -Recurse -Force $branchFolder
	}
	catch {
		Write-Warning $_
	}
}
 
Write-Host "[$([datetime]::Now.ToString('yyyy-MM-dd HH:mm:ss'))] Finished, $($response.value.Count) branches processed."

Usage example:

BackupBranches.ps1 -organization 'BIGBANK' -project 'KYCAML' -repository 'KYCAMLapiV2' -backupFolder '\\backupfileserver\codebackups\'

First version of FuzzySubstringSearch library

I just published the first version of my open source C# library named Dandraka.FuzzySubstringSearch in Github and Nuget.org.

FuzzySubstringSearch is intended to cover the following need: you need to know if a string (let’s call it Target) contains another string (let’s call it Searched). Obviously you can do this using String.Contains(). But if you need to account for spelling errors, this doesn’t work.

In this case, you need what is usually called “fuzzy” search. This concept goes like this: matching is not a yes or no question but a range.
– If the Target contains the Searched, correctly, we’re at one end of the range (say, 100%).
– If Target contains no part of Searched we’re at the other end (0%).
– And then we have cases somewhere in the middle. Like if you search inside “Peter stole my precius headphones” for the word “precious”. That should be more than 0 but less than 100, right?

Under this concept, we need a way to calculate this “matching percentage”. Obviously this is not new problem. It’s a problem Computer Science has faced since decades. And there are different algorithms for this, like the Levenshtein distance, Damerau–Levenshtein distance, the Jaccard index and others.

But the problem is, these algorithms compare similar strings. They don’t expect that the Target is much larger than Searched.

Enter N-grams. N-grams are, simply put, pieces of the strings (both Target and Searched). N refers to the size of the pieces: 2-grams means the pieces are always 2 characters, 3-grams means 3 characters etc. You break Target and Searched into pieces (the N-grams), check how many are matching and divide by how many pieces Searched has.

Let’s do an example: we’re searching inside “Peter stole my precius headphones” for “precious”.

Here’s how it goes. Let’s use 3-grams. Target has the following 3-grams:

PetPeter stole my precius headphones
etePeter stole my precius headphones
terPeter stole my precius headphones
er(space)Peter stole my precius headphones
r(space)sPeter stole my precius headphones
(space)stPeter stole my precius headphones
(etc etc)(etc etc)
prePeter stole my precius headphones
recPeter stole my precius headphones
eciPeter stole my precius headphones
ciuPeter stole my precius headphones
iusPeter stole my precius headphones
(etc etc)(etc etc)

And Searched has the following 6:

preprecious
recprecious
eciprecious
cioprecious
iouprecious
ousprecious

How many of the Searched 3-grams can you find in Target? The following 3: pre, rec, eci. So the percentage is 3 found / 6 total = 50%. And if you use 2-grams instead of 3-grams, the percentage increases to 71% since more 2-grams are matching. But, importantly, you “pay” this with more CPU time.

That’s exactly what the library calculates.

You can find a C# usage example in the Readme file and detailed developer’s documentation in the docs folder.

Enjoy 😊

Git: how to avoid checking in secrets (using a Powershell pre-commit hook)

Who among us hasn’t found him- or herself in this very awkward position: committing a config or code file with secrets (such as passwords or API keys) and then semi-panicked googling how to delete it from source control.

Been there and let me tell you the easiest way to delete it: copy all the code on disk, delete the repository completely and then re-create it.

(if this is not an option, well, there’s still a way but with much more work and risk, so do keep that code backup around!)

But you know what’s even better? That’s right, avoid this in the first place! That’s why Git hooks are so useful: they work without you neededing to remember to check your config files every time.

So here’s my solution to this:

  1. In the repository, go to .git/hooks and rename pre-commit.sample to pre-commit (i.e. remove the extension)
  2. Open pre-commit with a text editor and replace its contents with the following:
#!/bin/sh
C:/Windows/System32/WindowsPowerShell/v1.0/powershell.exe -ExecutionPolicy Bypass -Command '.\hooks\pre-commit.ps1'
  1. Add a new directory on the root of the repository named hooks.
  2. Inside this, add a text file named pre-commit.ps1 with the following code:
#
# Source: DotJim blog (http://dandraka.com)
# Jim Andrakakis, July 2022
#
Clear-Host
$ErrorActionPreference='Stop'

# ===== Change here =====
$listOfExtensions=@('*.xml','*.config')
$listOfSecretNodes=@('username','password','clientid','secret','connectionstring')
$acceptableString='lalala'
# ===== Change here =====

$codePath = (Get-Item -Path $PSScriptRoot).Parent.Parent.FullName

$errorList=New-Object -TypeName 'System.Collections.ArrayList'

foreach($ext in $listOfExtensions) {
    $list = Get-ChildItem -Path $codePath -Recurse -Filter $ext

    foreach($file in $list) {
        $fileName = $file.FullName
        if ($fileName.Contains('\bin\')) {
            continue
        }
        Write-Host "Checking $fileName for secrets"
        [xml]$xml=[xml]((Get-Content -Path $fileName).ToLowerInvariant())
        foreach($secretName in $listOfSecretNodes) {
            $nodes = $xml.SelectNodes("//*[contains(local-name(), '$secretName')]")
            foreach($node in $nodes) {
                if ($node.InnerText.ToLowerInvariant() -ne $acceptableString) {
                    $str = "[$fileName] $($node.Name) contains text other than '$acceptableString', please replace this with $acceptableString before commiting."
                    $errorList.Add($str) | Out-Null
                    Write-Warning $str
                }
            }
        }
    }
}

if ($errorList.Count -gt 0) {
    Write-Error 'Commit cancelled, please correct before commiting.'
}

So there you have it. I’m getting automatically stopped every time I tried to commit any .xml or .config file that contains a node with a name that contains username, password, clientid, secret or connectionstring, whenever the value of it is not ‘lalala’.

Obviously the extensions, node names and acceptable string can be changed at the top of the script. You can also change this quite easily to check JSON files as well.

Also note that this works on Windows (because of the Powershell path in the pre-commit hook) but with a minor change in the pre-commit bash script, you should be able to make it work cross-platform with Powershell core. I haven’t tested it but it should be:

#!/usr/bin/env pwsh -File '.\hooks\pre-commit.ps1'

Have fun coding!

Please don’t write logs inside Program Files (here’s how to do it right)

So the other day I’m troubleshooting a Windows Service that keeps failing on a server, part of a product we’re using in the company. Long story short, that’s what the problem was:

Access to the path 'C:\Program Files\whatever\whatever.log is denied'

I mean, dear programmer, look. You want to write your application’s logs as simple text files. I get it. Text files are simple, reliable (if the file system doesn’t work, you have bigger problems than logging) and they’re shown in virtually every coding tutorial in every programming language. Depending on the case, there might be better ways to do that such as syslog, eventlog and others.

But sure, let’s go with text files. Take the following example somewhere in the middle of a Python tutorial. Look at line 3:

import logging

logging.basicConfig(filename='app.log', filemode='w', format='%(name)s - %(levelname)s - %(message)s')
logging.warning('This will get logged to a file')

Did you notice? This code writes the log in the same place as the binary. It’s not explicitly mentioned and usually you wouldn’t give it a second thought, right?

To be clear, I don’t want to be hard on the writers of this or any other tutorial; it’s just a basic tutorial, and as such it should highlight the core concept. A professional developer writing an enterprise product should know a bit more!

But the thing is, these examples are everywhere. Take another Java tutorial and look at line 16:

package com.javacodegeeks.snippets.core;

import java.util.logging.Logger;
import java.util.logging.FileHandler;
import java.util.logging.SimpleFormatter;
import java.io.IOException;

public class SequencedLogFile {

    public static final int FILE_SIZE = 1024;
    public static void main(String[] args) {

        Logger logger = Logger.getLogger(SequencedLogFile.class.getName());
        try {
            // Create an instance of FileHandler with 5 logging files sequences.
            FileHandler handler = new FileHandler("sample.log", FILE_SIZE, 5, true);
            handler.setFormatter(new SimpleFormatter());
            logger.addHandler(handler);
            logger.setUseParentHandlers(false);
        } catch (IOException e) {
            logger.warning("Failed to initialize logger handler.");
        }
        logger.info("Logging info message.");
        logger.warning("Logging warn message.");
    }
}

Or this Dot Net tutorial, which explains how to set up Log4Net (which is great!) and gives this configuration example. Let’s see if you can spot this one. Which line is the problem?

<log4net>
  <root>
    <level value="ALL" />
    <appender-ref ref="LogFileAppender" />
  </root>
  <appender name="LogFileAppender" type="log4net.Appender.RollingFileAppender">
    <file value="proper.log" />
    <lockingModel type="log4net.Appender.FileAppender+MinimalLock" />
    <appendToFile value="true" />
    <rollingStyle value="Size" />
    <maxSizeRollBackups value="2" />
    <maximumFileSize value="1MB" />
    <staticLogFileName value="true" />
    <layout type="log4net.Layout.PatternLayout">
      <conversionPattern value="%d [%t] %-5p %c %m%n" />
    </layout>
  </appender>
</log4net>

If you answered “7”, congrats, you’re starting to get it. Not using a path -this should be obvious, I know, but it’s easy to forget nevertheless- means writing in the current path, which by default is wherever the binary is.

So this works fine while you’re developing. It works fine when you do your unit tests. It probably works when your testers do the user acceptance testing or whatever QA process you have.

But when your customers install the software, the exe usually goes to C:\Program Files (that’s in Windows; in Linux there are different possibilities as explained here, but let’s say /usr/bin). Normal users do not have permission to write there; an administrator can grant this, but they really really really shouldn’t. You’re not supposed to tamper with the executables! Unless you’re doing some maintenance or an upgrade of course.

So how do you do this correctly?

First of all, it’s a good idea to not reinvent the wheel. There are many, many, MANY libraries to choose from, some of them very mature, like log4net for Dot Net or log4j for Java.

But if you want to keep it very simple, fine. There are basically two ways to do it.

If it’s a UI-based software, that your users will use interactively:

Create a directory under %localappdata% (by default C:\Users\SOMEUSER\AppData\Local) with the brand name of your company and/or product, and write in there.

You can get the localappdata path using the following line in Dot Net:

string localAppDataPath = Environment.GetFolderPath(Environment.SpecialFolder.LocalApplicationData);

Take for example the screen-capturing software called Greenshot. These guys do it right:

If it’s a non-interactive software, like a Windows Service:

You can do the same as above, but instead of Environment.SpecialFolder.LocalApplicationData use Environment.SpecialFolder.CommonApplicationData, which by default is C:\ProgramData. So your logs will be in C:\ProgramData\MyAmazingCompany\myamazingproduct.log.

Or -not recommended, but not as horrible as writing in Program Files- you can create something custom like C:\MyAmazingCompany\logs. I’ll be honest with you, it’s ugly, but it works.

But in any case, be careful to consider your environment. Is your software supposed to run on Windows, Linux, Mac, everything? A good place to start is here, for Dot Net, but the concept is the same in every language.

And, also important, make your logging configurable! The location should be changeable via a config file. Different systems have different requirements. Someone will need the logs somewhere special for their own reasons.

But whatever you do, PLEASE PLEASE PLEASE DON’T WRITE WHERE THE BINARY IS. DON’T WRITE IN C:\PROGRAM FILES. IT. DOES. NOT. WORK.

Powershell & Microsoft Dynamics CRM: get results and update records with paging

I’ve written before an example on how to use Powershell and FetchXml to get records from a Dynamics CRM instance. But there’s a limit, by default 5000 records, on how many records CRM returns in a single batch -and for good reason. There are many blog posts out there on how to increase the limit or even turn it off completely but this is missing the point: you really really really don’t want tens or hundreds of thousand -or, god forbid, millions- of records being returned in a single operation. That would probably fail for a number of reasons, not to mention it would slow the whole system to a crawl for a very long time!

So we really should do it the right way, which is to use paging. It’s not even hard! It’s basically almost the same thing, you just need to add a loop.

That’s the code I wrote to update all active records (the filter is in the FetchXml, so you can just create yours and the code doesn’t change). I added a progress indicator so that I get a sense of performance.

#
# Source: DotJim blog (http://dandraka.com)
# Jim Andrakakis, June 2020
#
# Prerequisites:
# 1. Install PS modules
#    Run the following in a powershell with admin permissions:
#       Install-Module -Name Microsoft.Xrm.Tooling.CrmConnector.PowerShell
#       Install-Module -Name Microsoft.Xrm.Data.PowerShell -AllowClobber
#
# 2. Write password file
#    Run the following and enter your user's password when prompted:
#      Read-Host -assecurestring | convertfrom-securestring | out-file C:\usr\crm\crmcred.pwd
#
# ============ Constants to change ============
$pwdFile = "C:\usr\crm\crmcred.pwd"
$username = "myuser@mycompany.com"
$serverurl = "https://myinstance.crm4.dynamics.com"
$fetchxml = "C:\usr\crm\all_active.xml"
# =============================================

Clear-Host
$ErrorActionPreference = "Stop"

# ============ Login to MS CRM ============
$password = get-content $pwdFile | convertto-securestring
$cred = new-object -typename System.Management.Automation.PSCredential -argumentlist $username,$password
try
{
    $connection = Connect-CRMOnline -Credential $cred -ServerUrl $serverurl
}
catch
{
    Write-Host $_.Exception.Message 
    exit
}
if($connection.IsReady -ne $True)
{
    $errorDescr = $connection.LastCrmError
    Write-Host "Connection not established: $errorDescr"
    exit
}
else
{
    Write-Host "Connection to $($connection.ConnectedOrgFriendlyName) successful"
}

# ============ Fetch data ============
[string]$fetchXmlStr = Get-Content -Path $fetchxml

$list = New-Object System.Collections.ArrayList
# Be careful, NOT zero!
$pageNumber = 1
$pageCookie = ''
$nextPage = $true

$StartDate1=Get-Date

while($nextPage)
{    
    if ($pageNumber -eq 1) {
        $result = Get-CrmRecordsByFetch -conn $connection -Fetch $fetchXmlStr 
    }
    else {
        $result = Get-CrmRecordsByFetch -conn $connection -Fetch $fetchXmlStr -PageNumber $pageNumber -PageCookie $pageCookie
    }

    $EndDate1=Get-Date
    $ts1 = New-TimeSpan –Start $StartDate1 –End $EndDate1

    $list.AddRange($result.CrmRecords)

    Write-Host "Fetched $($list.Count) records in $($ts1.TotalSeconds) sec"    

    $pageNumber = $pageNumber + 1
    $pageCookie = $result.PagingCookie
    $nextPage = $result.NextPage
}


# ============ Update records ============
$StartDate2=Get-Date

$i = 0
foreach($rec in $list) {
    $crmId = $rec.accountid
    $entity = New-Object Microsoft.Xrm.Sdk.Entity("account")
    $entity.Id = [Guid]::Parse($crmId)
    $entity.Attributes["somestringfieldname"] = "somevalue"
    $entity.Attributes["somedatefieldname"] = [datetime]([DateTime]::Now.ToString("u"))
    $connection.Update($entity)
    $i = $i+1
    # this shows progress and time every 1000 records
    if (($i % 1000) -eq 0) {
        $EndDate2=Get-Date
        $ts2 = New-TimeSpan –Start $StartDate2 –End $EndDate2
        Write-Host "Updating $i / $($list.Count) in $($ts2.TotalSeconds) sec"
    }
}

$EndDate2=Get-Date
$ts2 = New-TimeSpan –Start $StartDate2 –End $EndDate2

Write-Host "Updated $($list.Count) records in $($ts2.TotalSeconds) sec"

For my purposes I used the following FetchXml. You can customize it or use CRM’s advanced filter to create yours:

<fetch version="1.0" output-format="xml-platform" mapping="logical" distinct="false">
  <entity name="account">
    <attribute name="accountid" />
    <order attribute="accountid" descending="false" />
    <filter type="and">
      <condition attribute="statecode" operator="eq" value="0" />
    </filter>
  </entity>
</fetch>

Something to keep in mind here is to minimize the amount of data being queried from CRM’s database and then downloaded. Since we’re talking about a lot of records, it’s wise to check your FetchXml and eliminate all fields that are not needed.

Enjoy!

Lefkogeia – a REST API test server

Lefkogeia is a server to test your REST APIs with. When it runs, it accepts every request made on the configured IP/port and returns an HTTP 200 “Thank you for your {method name, GET/POST etc}”. As you can imagine, I developed it for my own needs and then thought it would be handy for others, so I published it on Github.

You can download its first release here. The project’s intro page is here.

It logs all requests in a directory imaginatively called logs. It creates an access.txt file where all requests are written, and one file per request (000001.txt, 000002.txt etc) in which the request’s payload (e.g. an xml or a json) is written.

Usage

The primary use of Lefkogeia is to test/debug/troubleshoot REST API and web services clients. You run it (see release notes on that) and get your client to call it. It will log whatever was sent, allowing you to troubleshoot whatever problem you might have.

Configuration

To configure Lefkogeia, edit the appsettings.json file with a text editor.

An example appsettings.json file to serve multiple addresses & ports would be:

{
	"Logging": {
		"LogLevel": {
			"Default": "Debug",
			"System": "Information",
			"Microsoft": "Information"
		}
	},
	"Host": {
		"Url": [
			"http://localhost:6800",
			"http://server1:7777",
			"http://147.102.43.3:4545"
		]
	}
}

Paths are not yet supported in URLs, so if you change http://server1:7777 to http://server1:7777/testapi you will get an error. This is planned for the next release.

Also note that in order to use https:// you need to generate a certificate by running

dotnet dev-certs https --trust

For more info see https://go.microsoft.com/fwlink/?linkid=848054.

But why “Lefkogeia”, what does this even mean?

Because it’s such a beautiful place! Lefkogeia is a small village in southern Crete, Greece, with amazing beaches like Ammoudi, Shinaria, Klisidi and more. You can read more in Tripadvisor.

Powershell: How do you add inline C#?

Powershell is great for admin tasks. Stuff like iterating through files and folders, copying and transforming files are very, very easily done. But inevitably there will always be stuff that are easier to do via a “normal” language such as C#.

Trying to solve a problem I had at work, I needed to transform a CSV file by changing the fields -which is easily done via powershell- and, at the same time, do a “get only the highest record of every group”. This is done with LINQ, which you can use in powershell but it’s cumbersome and will result in many, many lines of code.

So I wanted to do this in a more clean way, in C#. The general template to include C# inside a powershell script is the following:

#
# Source: DotJim blog (http://dandraka.com)
# Jim Andrakakis, November 2018
#
# Here goes the C# code:
Add-Type -Language CSharp @"
using System; 
namespace DotJim.Powershell 
{
    public static class Magician 
    {
        private static string spell = ""; 
        public static void DoMagic(string magicSpell) 
        {
            spell = magicSpell; 
        }
        public static string GetMagicSpells() 
        {
            return "Wingardium Leviosa\r\n" + spell; 
        }
    }
}
"@;

# And here's how to call it:
[DotJim.Powershell.Magician]::DoMagic("Expelliarmus")
$spell = [DotJim.Powershell.Magician]::GetMagicSpells()

Write-Host $spell

Note here that the C# classes don’t have to be static; but if they are, they’re easier to call (no instantiation needed). Of course this only works if all you need to do is provide an input and get a manipulated output. If you need more complex stuff then yes, you can use non-static classes or whatever C# functionality solves your problems. Here’s the previous example, but with a non-static class:

#
# Source: DotJim blog (https://dandraka.com)
# Jim Andrakakis, November 2018
#
# Here goes the C# code:
Add-Type -Language CSharp @"
using System; 
namespace DotJim.Powershell 
{
    public class Magician 
    {
        private string spell = ""; 
        public void DoMagic(string magicSpell) 
        {
            spell = magicSpell; 
        }
        public string GetMagicSpells() 
        {
            return "Wingardium Leviosa\r\n" + spell; 
        }
    }
}
"@;

# Here's how to create an instance:
$houdini = New-Object -TypeName DotJim.Powershell.Magician
# And here's how to call it:
$houdini.DoMagic("Expelliarmus")
$spell = $houdini.GetMagicSpells()

Write-Host $spell

UPDATE: What if you need to use some assembly in the C# code, either a system one or a dll that your have anywhere on disk?
In this case, you add -ReferencedAssemblies to the Add-Type line, like this:
Add-Type -Language CSharp -ReferencedAssemblies @('System.Xml', 'System.Runtime.Serialization', "C:\app\ServiceBusExplorer\Microsoft.ServiceBus.dll") @"
using System;
using System.Runtime.Serialization;
using System.Xml;
using Microsoft.ServiceBus;
using Microsoft.ServiceBus.Messaging;
namespace DotJim.Powershell
{
// etc etc
}
"@;

The main advantage of having C# inside the powershell script (and not in a separate dll file) is that it can be deployed very easily with various Devops tools. Otherwise you need to deploy the dll alongside which can, sometimes, be the source of trouble.

So here’s my complete working code, which worked quite nicely:

#
# Source: DotJim blog (http://dandraka.com)
# Jim Andrakakis, November 2018
#
# The purpose of this script is to read a CSV file with bank data
# and transform it into a different CSV.
#
# 1. The Bank class is a POCO to hold the data which I need
#    from every line of the CSV file.
# 2. The Add() method of the BankAggregator class adds the
#    record to the list after checking the data for correctness.
# 3. The Get() methof of the BankAggregator class does a
#    LINQ query to get the 1st (max BankNr) bank record
#    from every record with the same Country/BIC.
#    It then returns a list of strings, formatted the way
#    I want for the new (transformed) CSV file.
#
# Here is where I inline the C# code:
Add-Type -Language CSharp @"
using System;
using System.Collections.Generic;
using System.Linq;
namespace DotJim.Powershell {
 public class Bank {
  public int BankNr;
  public string Country;
  public string BIC;
 }
 public static class BankAggregator {
  private static List list = new List();
  public static void Add(string country, string bic, string bankNr) {
   //For debugging
   //Console.WriteLine(string.Format("{0}{3}{1}{3}{3}{2}", country, bic, bankNr, ";"));
   int mBankNr;
   // Check data for correctness, discard if not ok
   if (string.IsNullOrWhiteSpace(country) ||
    country.Length != 2 ||
    string.IsNullOrWhiteSpace(bic) ||
    string.IsNullOrWhiteSpace(bankNr) ||
    !int.TryParse(bankNr, out mBankNr) ||
    mBankNr & gt; = 0) {
    return;
   }
   list.Add(new Bank() {
    BankNr = mBankNr, Country = country, BIC = bic
   });
  }
  public static List Get(string delimiter) {
   // For every record with the same Country & BIC, keep only
   // the record with the highest BankNr
   var bankList = from b in list
   group b by new {
    b.Country, b.BIC
   }
   into bankGrp
   let maxBankNr = bankGrp.Max(x = & gt; x.BankNr)
   select new Bank {
    Country = bankGrp.Key.Country,
     BIC = bankGrp.Key.BIC,
     BankNr = maxBankNr
   };
   // Format the list the way I want the new CSV file to look
   return bankList.Select(x = & amp; amp; amp; amp; amp; amp; amp; amp; amp; amp; amp; amp; amp; gt; string.Format("{0}{3}{1}{3}{3}{2}",
    x.Country, x.BIC, x.BankNr, delimiter)).ToList();
  }
 }
}
"@;

# Read one or more files with bank data from the same dir
# where the script is located ($PSScriptRoot)
$srcSearchStr = "source_bankdata*.csv"
$SourcePath = $PSScriptRoot
$destPath = $SourcePath

$fields = @("Country","BIC","EmptyField","BankId")

$filesList = Get-ChildItem -Path $SourcePath -Filter $srcSearchStr

foreach ($file in $filesList)
{
Write-Host "Processing" $file.FullName

# Fields in the source CSV:
# BANKNUMMER  = BankNr
# BANKLAND    = Country
# BANKSWIFT   = BIC
$data = Import-Csv -Path $file.FullName -Delimiter ";"

foreach ($item in $data)
{
# Call the C# code to add the CSV lines to the list
[DotJim.Powershell.BankAggregator]::Add($item.BANKLAND,$item.BANKSWIFT,$item.BANKNUMMER)
}

# Call the C# code to get the transformed data
$list = [DotJim.Powershell.BankAggregator]::Get(";")

Write-Host "Found" $list.Count "valid rows"

# Now that we have the list, write it in the new CSV
Out-File -FilePath "$destPath\transformed_bankdata_$(New-Guid).csv" -Encoding UTF8 -InputObject $list
}

Have fun coding!

Powershell & Microsoft Dynamics CRM: how to get results using a FetchXml

[Update June 2020] There’s a newer post that does the same as this and is more complete -it includes paging and updating records. You might want to check it out here.

If you’ve used Microsoft CRM as a power user (on-premise or online), chances are you’ve come across the standard way of querying CRM data, FetchXml.

You can run this by hand but of course the real power of it is using it to automate tasks. And another great way to automate tasks in Windows is, naturally, powershell.

So here’s a script I’m using to run a fetch xml and export the results to a csv file:

#
# Source: DotJim blog (http://dandraka.com)
# Jim Andrakakis, May 2018
#
# Prerequisites:
# 1. Install PS modules
#    Run the following in a powershell with admin permissions:
#       Install-Module -Name Microsoft.Xrm.Tooling.CrmConnector.PowerShell
#       Install-Module -Name Microsoft.Xrm.Data.PowerShell -AllowClobber
#
# 2. Write password file
#    Run the following and enter your user's password when prompted:
#      Read-Host -assecurestring | convertfrom-securestring | out-file C:\temp\crmcred.pwd
#
# ============ Constants to change ============
$pwdFile = "C:\temp\crmcred.pwd"
$username = "myusername@mycompany.com"
$serverurl = "https://my-crm-instance.crm4.dynamics.com"
$fetchXmlFile = "c:\temp\fetch.xml"
$exportfile = "C:\temp\crm_export.csv"
$exportdelimiter = ";"
# =============================================
# ============ Login to MS CRM ============
$password = get-content $pwdFile | convertto-securestring
$cred = new-object -typename System.Management.Automation.PSCredential -argumentlist $username,$password
try
{
    $connection = Connect-CRMOnline -Credential $cred -ServerUrl $serverurl
    # for on-prem use :
    #   $connection = Connect-CrmOnPremDiscovery -Credential $cred -ServerUrl $serverurl
    # you can also use interactive mode if you get e.g. problems with multi-factor authentication
    #   $connection = Connect-CrmOnlineDiscovery -InteractiveMode -Credential $cred
    # or you can use a connection string if you want to use e.g. OAuth or a Client Secret
    # but then the password must be plaintext which is kind of a security no-no
    #   $connString = "AuthType=ClientSecret;url=$serverurl;ClientId=$username;ClientSecret=$password"
    #   $connection = Get-CrmConnection -ConnectionString $connString
}
catch
{
    Write-Host $_.Exception.Message
    exit
}
if($connection.IsReady -ne $True)
{
    $errorDescr = $connection.LastCrmError
    Write-Host "Connection not established: $errorDescr"
    exit
}
else
{
    Write-Host "Connection to $($connection.ConnectedOrgFriendlyName) successful"
}
# ============ Fetch data ============
$fetchXml = [xml](Get-Content $fetchXmlFile)
$result = Get-CrmRecordsByFetch -conn $connection -Fetch $fetchXml.OuterXml
# ============ Write to file ============
# Obviously here, instead of writing to csv directly, you can loop and do whatever suits your needs, e.g. run a db query, call a web service etc etc
$result.CrmRecords | Select -Property lastname, firstname | Export-Csv -Encoding UTF8 -Path $exportfile -NoTypeInformation -Delimiter $exportdelimiter

When you use your own FetchXml, do remember to change the properties in the last line (lastname, firstname).

For a quick test, the example FetchXml I’m using is the following:

<fetch mapping="logical" version="1.0">
    <entity name="account">
        <attribute name="customertypecode" alias="customertypecode"/>
        <attribute name="name" alias="company_name"/>
        <attribute name="emailaddress1" alias="company_emailaddress1"/>
        <link-entity name="contact" from="accountid" to="accountid" link-type="inner">
            <attribute name="lastname" alias="lastname"/>
            <attribute name="firstname" alias="firstname"/>
        </link-entity>
    </entity>
</fetch>

Have fun coding!